Whether I’m sewing, crocheting, card making, painting, or doodling, I’m always making something here in Kamloops, B.C. Don’t forget to check out my free digitals and vintage graphics while you’re here. Enjoy your visit!
Showing posts with label freebies. Show all posts

Jul 14, 2023

Free Crochet Freezie Holders for kids patterns

Hello,

It’s been extremely hot here in the interior of BC, so I wasn’t too surprised when I noticed that my freezie holders for kids were getting a lot of attention lately. These adorable crocheted freezie holders do up quickly and the kids love them. They keep their little fingers from freezing up &  getting wet and sticky. Check the sidebar for two posts with patterns included for four different holders, plus a link to six more of my freezie holder patterns on Ravelry. Links below.


On the blog:


On Ravelry: 


Enjoy your summer

Mar 11, 2023

Fabric Postcards 2.0 (freebie)

Good morning,

Some new postcards sprung up out of my sewing machine recently. This first one is a combination of applique with ribbon embellishment and homemade fabric word phrases. I made up the postcard backs myself and printed them off. The fabric word phrases and how they’re made are discussed in THIS post. 


The backs are finished off by turning the fabric to the back (used some light heat n bond as a temporary fixture), ironing it in place and then a simple stitch all the way round. The postcard backing was attached with an iron, but I added some glossy accents to the perimeter of the card so it’ll hold well on the edges. 


These next ones were fun to make. As you can see they’re finished off with binding, but I again turned the fabric to the back, ironed it in place then ironed the postcard back on top glueing the edges with a thin strip of glossy accents. 


When I made up my own postcard backs I didn’t want anything fancy but fairly simple and so made up the ones in the photo directly above. 

Here is a copy of them if you'd like to print them off to use on your project. Just click on the image below and it'll take you to another page, you can print them off from there. These are made for 4"X 6" postcards.


I also made two cards with some fabric art on them. I used Karolina b craft as inspiration for these two. I like to make them as she’s done them, then I’ll branch out from there with my own designs. I did add some word inspiration. 


These were each fastened to an off white card backing. (One was taken in darker surroundings but it’s the same card set). I used a tip from my friend Diane at The Beaded Lime (check out her gorgeous art work). She used carpet tape to fasten these on to her cards. Cheap, and believe me when I tell you it will NOT come off. Lol.

Well thank you for dropping by, tell your friends about the freebie.
Blessings,

Carmen


Dec 8, 2022

Cupcake Mug Rug

Good morning crafters! 

Today I have a cupcake pattern that can be made into a mug rug, a coaster, or whatever you choose to use it on. A T-shirt maybe? Your imagination is the limit. Mine was part of a birthday gift.

I chose to turn it into a mugrug, and I’ll include a template for the cupcake below. 

It is a pretty simple piece to make. All I needed was some scrap fabric and batting. 


The completed mugrug


For this mugrug I used mostly materials I had on hand. 

Supplies:

Cupcake pattern (below)
Fabric scraps for cupcake base and frostings, cherry or heart
Heat n bond - I used ultra hold. (for cupcake pieces only)
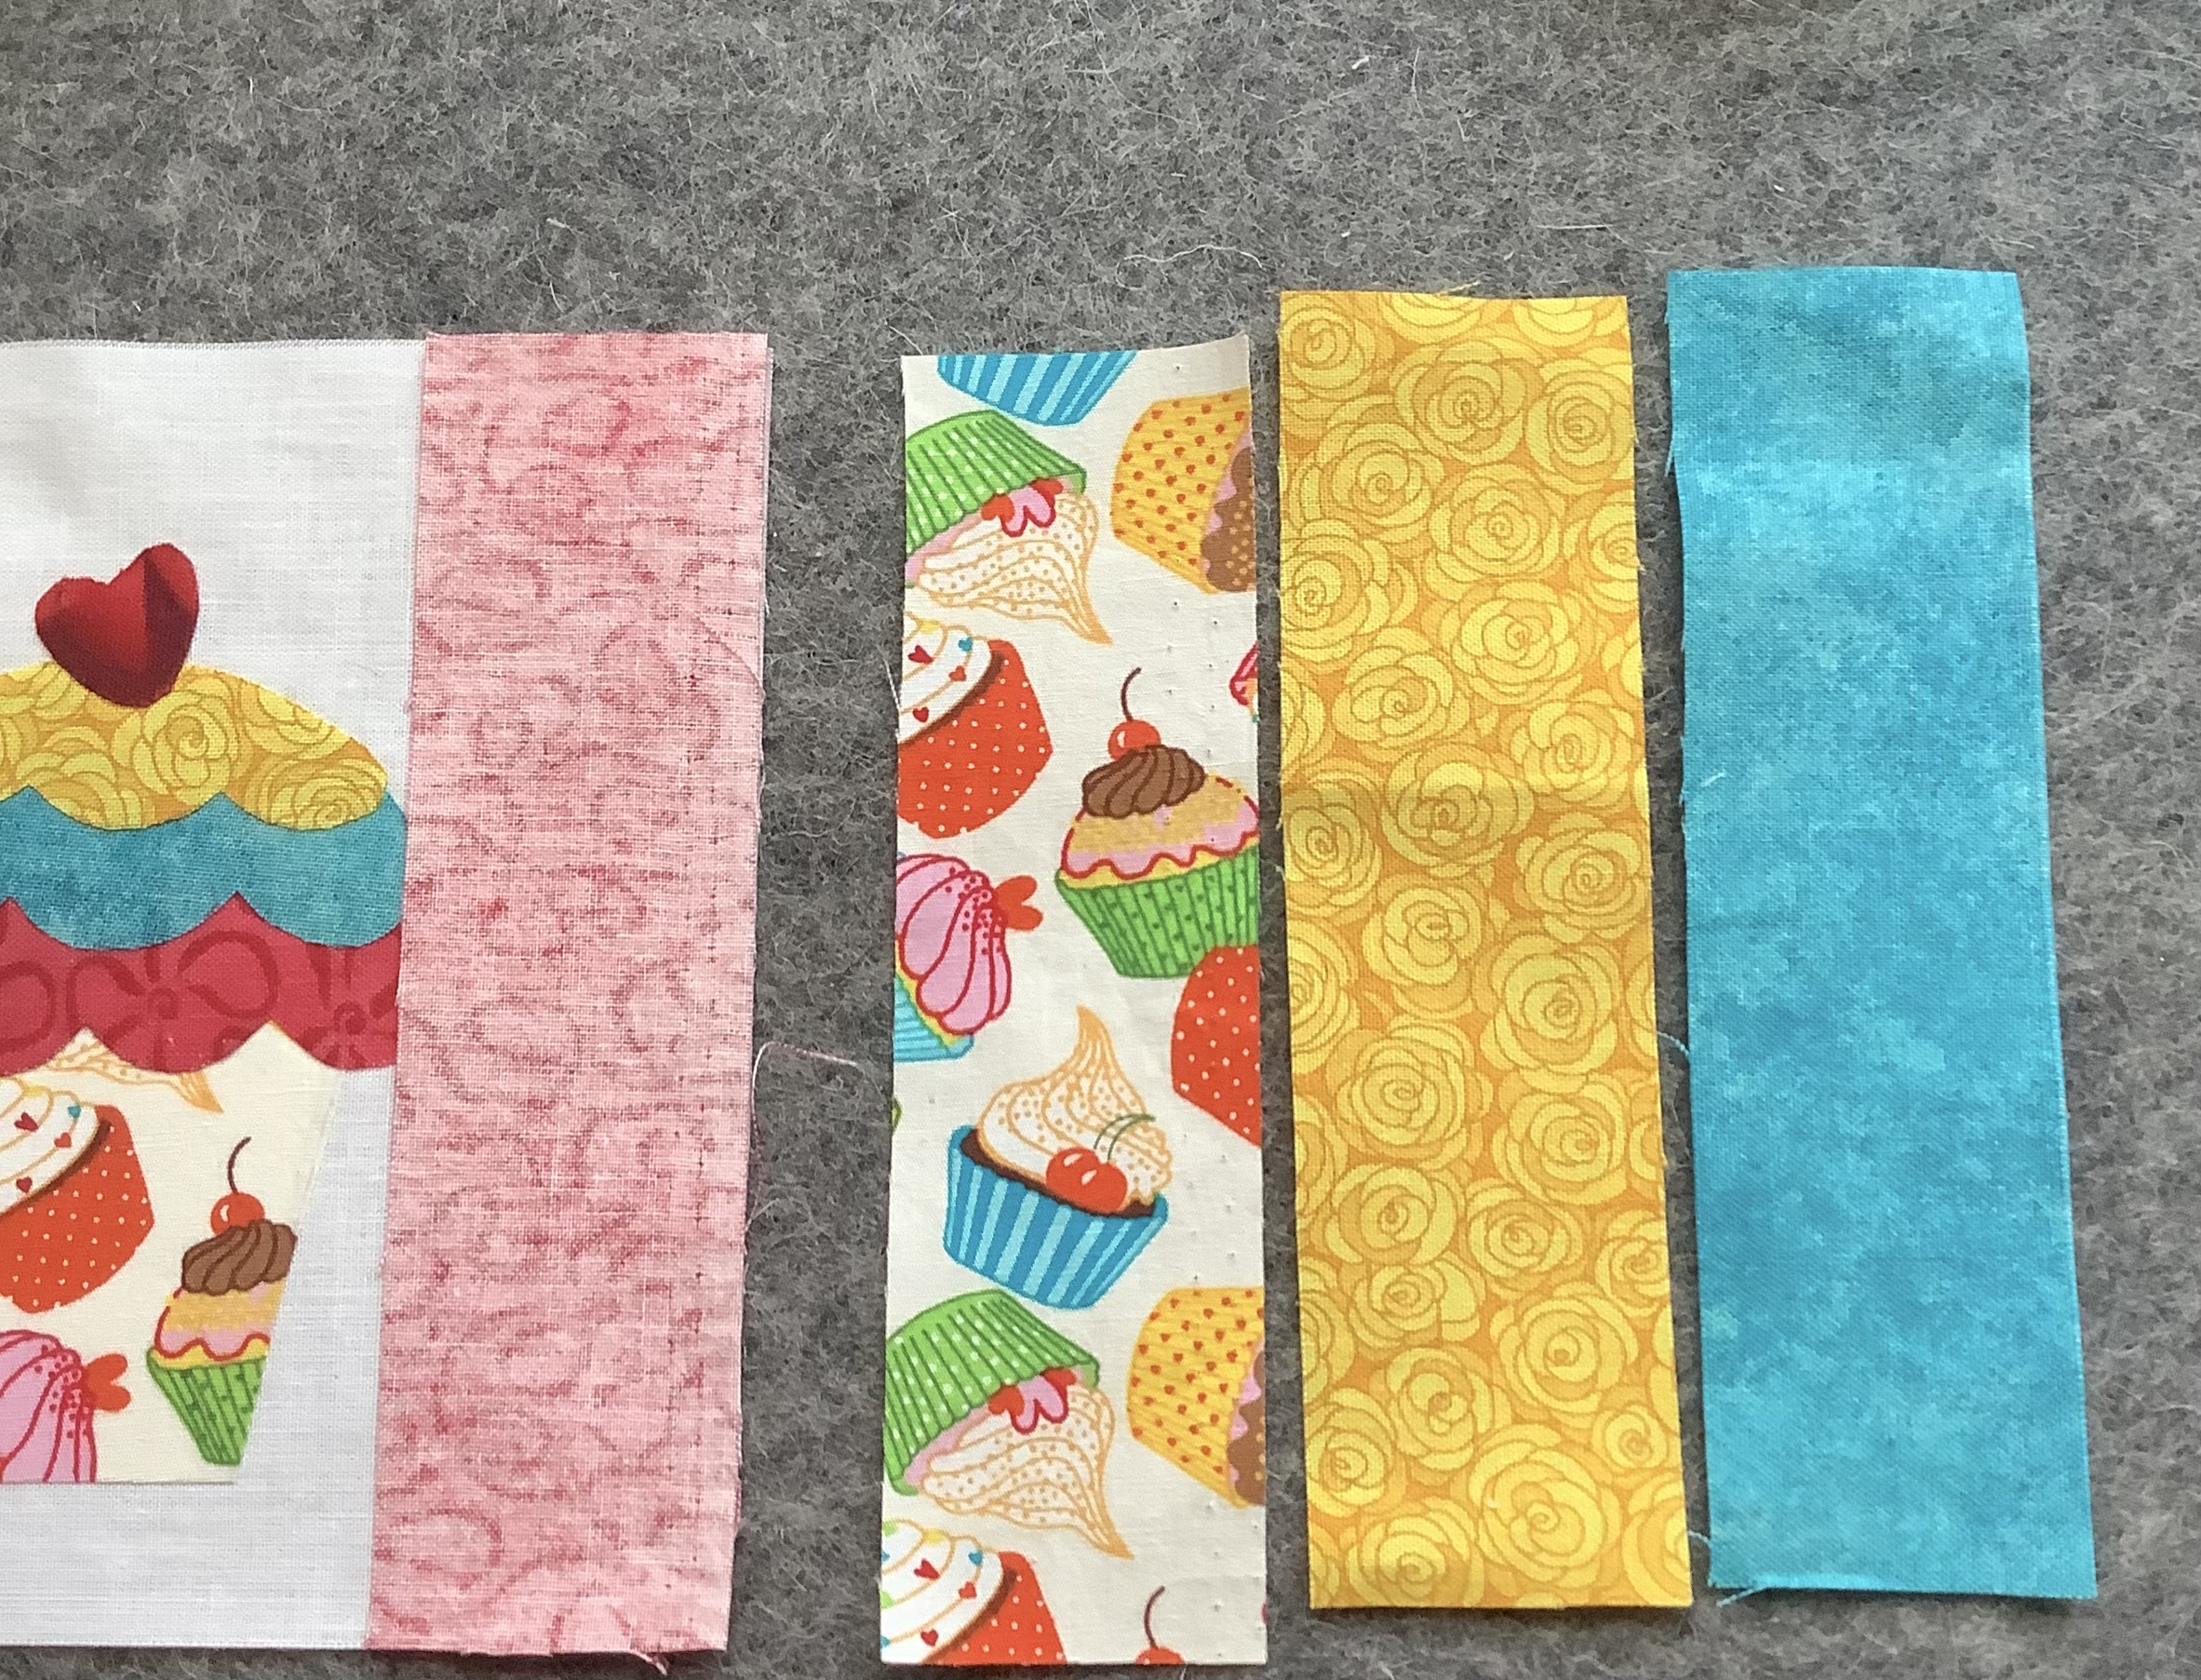
Backing fabric and batting each  9.5” x 5.5”
Front square- 5.5” x 5.5”
4 matching strips of fabric - 1.5” x 5.5” 
Approximately 45” binding fabric, 1.25” wide
Embroidery thread and needle.
(Iron, scissors, rotary cutter, square quilt ruler, thread, sewing machine with optional quilting foot)

Instructions

Print off each pattern piece on to cardstock, then cut them out.

Trace pattern pieces for cupcake onto the paper backing of the heat n bond. 

Cut out the heat n bond pieces allowing extra for a bit of a border around each piece. 

Lay the pattern pieces on chosen fabric pieces for cupcake (back side of fabric facing glue side of heat n bond) and iron into place. 

Cut out the pattern fabric pieces on the lines. 

Position your cupcake pieces on 5.5 x 5.5” fabric. 

(You can add the batting and do some quilting on the background for the cupcake, or leave it. I chose to leave it.) 

Remove paper backing and iron down each piece of the cupcake.

Add your batting and stitch them in place starting with the cupcake liner..
** with the ultra hold heat n bond you don’t have to stitch them in place.**

If you’ve used the cherry you can embroider a little stem in the top of it. 

Your cupcake side of the mugrug is done

To complete right side of front: 

Stitch 1.5 x 5.5” strip to right side of cupcake square (batting in place)  right side to right side, iron down over the seam. Do the same for remaining 3 strips.

Using a quilting ruler, square edges and cut any excess. 

Lay backing fabric wrong side up. Place your front piece and batting on top, right side up. 

Using a quilting ruler, square edges and cut any excess. 

Sandwich your mugrug for binding:

Place clips or pins to hold them in place. (You can stitch the edges if you like, a scant 1/8” seam)

Place your binding on the front edge and stitch in place using 1/4” seam.

*Binding will be folded in half lengthwise, then folded to the centerfold on each side and ironed in place.
(If you’re unaware of how to bind, please check YouTube for a short tutorial. It’s easy!) 

Hand stitch the binding back side, if you prefer not to stitch it in with the front. 

Done!


Click on the image above and print. This image can be sized larger or smaller. 

It looks like we are full swing into the Christmas season. If you want some recipes, decor, ornament and other ideas, check out my Christmas Sleigh Ride posts. 


Thanks for stopping by!
Blessings,
Carmen

Jul 21, 2021

Retirement Sentiments Freebie

Hi,

I'm still here and it's clear today. We had a wind warning last night which will be in place until Thursday, plus BC is under an emergency order for the wildfires. So I was a bit concerned last night, but it's all good. I can hear planes flying overhead to fight the fires and that's good.

I've been thinking about retirement since my husband recently retired, and out came a sheet of retirement sentiments. Okay, maybe it wasn't that easy, but it was fun!


Here you go, a sentiment freebie! I hope you can use them. 

This will probably be my last post this week, so have a great weekend.

PS: see “Digital Stamps info and terms” for information on how to download and use digital stamps. Situated below page header at the top of this blog. 

Blessings,

Carmen
Brutally Honest Slogans


Apr 19, 2021

Of Mice and Minion Freezie Holders (Free Patterns)

It's that time of year again in the 'Loops where the weather has suddenly turned warm and summer will soon have us sweating away wishing for some freezies, In 2017 I wrote up a few patterns for freezie holders which are available on Ravelry. However, I never made the Mickey, Minnie and Minion patterns for sale due to copyright laws with Disney. I just didn't think it was worth it. So today I've written those out for you to enjoy for free, here on the blog. I apologize for any formatting issues ---sometimes blogger just doesn't the copy paste feature!


MINION FREEZIE HOLDER

by Carmen Gamble Designs


G hook, Blue, Black, Yellow, White and light grey yarn.

Starting with blue yarn:

Row 1: Foundation HDC 18 and join in the round. Chain 1

(or chain 19, HDC in 2nd chain from hook and 1 HDC in remaining chains. Join with slip stitch to first chain being careful not to twist the chain. Chain 1. Work a row of 18 HDC and slip stitch to join. Chain 1. This completes the first row. Now continue with the rest of the pattern)

Row 2-5: HDC in same space as chain 1. HDC 1 in each remaining stitch. Slip stitch to join. Chain 1. (18)

*Change to yellow yarn while joining with slip stitch at end of row 5.

Row 6-10: HDC 1 in same space as chain 1. Continue 1 HDC in each stitch. Slip stitch to join. Chain 1. (18). Do not cut yellow yarn.

*Switch to black yarn while joining at end of row 10.

Row 11: HDC 1 in chain 1 space, HDC 1 in each remaining stitch, slip stitch to join. Chain 1. (18)

*Switch back to yellow yarn while joining at end of row.

Row 12-17: 1 HDC in chain 1 space and in remaining stitches for each round. Slip stitch to join. Chain 1. (18)

*Omit chain 1 for end of last row. Fasten off and work in loose ends.

EYE: White Yarn

Row 1: Make a magic circle and HDC 10, pull tight and slip stitch to first stitch. Ch 1. (10)

Row 2: HDC 2 in each stitch. Slip stitch to join. Chain 1. (20)

*Change to grey yarn in slip stitch to join. Ch. 1

Row 3: SC in same stitch as chain 1. SC 1 in each stitch around. (20)

Fasten off leaving a tail to sew it in place.

Sew eye onto body positioning it onto or above black stripe. Sew on black button wherever you want it.

HAIR: Black yarn

Cut 4 pieces of 5” yarn in black

Using 2 pieces of yarn at a time, fold them, pull the loop you've created through a stitch at the top of the head and pull through from front to back. Pull the rest of the yarn through the loop and pull taut. Cut to size (approx 1”)

MOUTH: Black yarn

With a darning needle, pull up a piece of black yarn on the third yellow row from the bottom. Count 2 stitches to the left and one row up, then pull yarn through to the back of the body. Bring a stitch up and around the middle of the yarn you made the mouth with to hold it in place and make it look like a little smirk. Use photo for guidance. Fasten off.

Minnie Mouse Freezie Holder

by Carmen Gamble Designs


G Hook. Pink, White, Black yarn. Starting with pink yarn.

Row 1: Foundation HDC 20 and join into a circle. Chain 1

(or Chain 21, HDC in 2nd chain from hook and 1 HDC in remaining chains. Join with slip stitch to first chain being careful not to twist the chain. HDC 1 in chain 1 space and HDC 1 in remaining stitches. Slip stitch to join. Now go on to the rest of the pattern)

Row 2-9: HDC 1 in chain 1 space. HDC 1 in remaining 19 stitches. Slip stitch to join. Chain 1. (20)

*End of row 9 slip stitch with black yarn to change color. Chain 1.

Row 10-15: HDC into chain 1 space, then HDC 1 in remaining 19 stitches. Slip stitch to join. Chain 1.

Fasten off at the end of last row. (20). Work in ends.

EARS: Black yarn

Row 1: Make a magic circle, chain 1. HDC 10 into magic circle. Pull the center tight to create your circle, and slip stitch to join. Chain 2 (10)

Row 2: HDC 2 in each stitch. Slip stitch to join. Fasten off (20)

The ears are attached with yarn. Line up the center of each ear with the top corner of the body. The ears should stick out the sides. Do not tack those down, just sew the portion of the ear onto the part that covers the body. Work in ends.

BOW:

Use pink yarn and chain 15

In 3rd chain from hook, 1 DC and 1DC in each of the next 12 chains.

Join ends of bow together leaving long tail and hold join in middle to create bow.

Wrap yarn tail around center of bow and with a darning needle fasten it in place.

*Leave enough of the yarn tail to sew bow onto body.

POLKA DOTS: White yarn

Make a magic circle, chain 1. 10 HDC in circle. Pull center tight and join circle with a slip stitch. Leave tail for sewing. Make 3 to 6, whatever your preference. Fasten off.

Mickey Mouse Freezie Holder

by Carmen Gamble Designs


G Hook, Red, Yellow, Black yarn. (Opt. Yellow buttons)

Starting with red yarn.

Row 1: Foundation HDC 20 and join into a circle. Chain 1.

(or Chain 21, HDC in 2nd chain from hook and 1 HDC in remaining chains. Join with slip stitch to first chain being careful not to twist the chain. HDC 1 in chain 1 space and HDC 1 in remaining stitches. Slip stitch to join. Now go on to the rest of the pattern)

Row 2-7: HDC 1 in chain 1 space. HDC 1 in remaining 19 stitches. Slip stitch to join. Chain 1. (20)

*End of last row slip stitch with black yarn to change color. Chain 1.

Row 8-15: HDC 1 in chain 1 space and each of stitches. Slip stitch to join. Chain 1. Fasten off at the end of the last row. (20). Work in ends.

EARS: Black yarn

Row 1: Make a magic circle, chain 1. HDC 10 into magic circle. Pull the center tight to create your circle, and slip stitch to join. Chain 2 (10)

Row 2: HDC 2 in each stitch. Slip stitch to join. Fasten off (20)

The ears are attached with yarn. Line up the center of each ear with the top corner of the body. The ears should stick out the sides. Do not tack those down, just sew the portion of the ear onto the part that covers the body. Work in ends.

SUSPENDER BUTTONS: Yellow yarn.

Make a magic circle. 5 SC in magic circle. Pull center tight. Slip stitch to join. (5)

Fasten off and keep a tail to sew them onto the body. See photo for placement.


*Pattern Link Below for Additional Freezie Holders.

Copyright Notice:

Feel free to sell items made from this pattern. A link back to this pattern in your listing would be appreciated but not required. Please do mention Carmen Gamble Designs or my blog name. :)

Check out my blog “Beyond the Fringe Crafts” for a free Ninja Freezie Holder pattern and other great project ideas.

Free Cute Little Freezie Holders Pattern

Thank you and Happy Hooking! No part of this pattern may be duplicated, sold or redistributed without written consent of the designer.

Thrills & Chills Freezie Holders


Feathered Friends Freezie Holders


Thanks for stopping by! Until next time!

Oct 7, 2020

Bright Daisy Birthday Card

I have a few birthdays coming up this month so I made a little daisy card today. The inspiration came from a quilt design I saw on Pinterest. With this card I decided to use all stripes just for the fun of it. I don't know if that's allowed, but I'm doing it anyway. Lol.

Here's my card. Very simple, easy to make. I drew up the petals, etc. myself. Glued them down, then grabbed a pen and did the dashes. A nice easy quick card. 


I used papers from Lawn Fawn, Really Rainbow 6x6, and Recollections Basics Mini Pad. Both are very nice bright paper pads - - I'm hanging onto the last colors of summer. I love Fall, but why the rush?

While scrolling I came across a really cute sentiment by Paula, from Handmade by Paula. Click on the link if you want one yourself. She used it on the front of her card and it's adorable! I decided to use it on the inside of my card. She has a few other freebies as well. Do have a look! As you can see, I carried the dashes on through the inside of the card too. 


Have a great day!
Carmen


Oct 6, 2020

Sweet Potato 3 Cancer Challenge

Good Morning,

It seems I'm up early this morning as I couldn't sleep. I feel great inspite of it, but we will see as the day progresses. I may need a little cat nap later on. Lol. 

As I lay there awake I thought I should post about Sweet Potato 3's Cancer Challenge. Are you a crocheter? If you are, you may not be aware of this sweet deal. Every October for the last 17 years, Christine at Sweet Potato 3 has been hosting a Cancer Challenge to make hats for people who have gone through cancer treatments and need to keep their heads warm. I have been participating in this challenge for the past 3 years. I pledge my hats to the Royal Inland Hospital Cancer ward in Kamloops every year. 

How it works:

Christine lines up a group of crochet designers for October every year who create a hat pattern. Most patterns are free for 24 hours provided you pledge to donate one or more of the finished hats to cancer. Every day of the month a new hat is offered, and two on Saturday. Some of the patterns are free for the whole month, so if you decide to participate, you may still find some of the last 5 are free and available, but again, only if you pledge one or more of the hats you make from that pattern. Of course, you're free to make more hats to gift or use for yourself. 

I usually pick out a few hats that I want to make and pledge at least one of each. I've done up to 12 or more different patterns a year and donated many. Some people do every one that is offered. Needless to say, I have a lot of hat patterns.

So if you like to crochet, I'll leave you the links and a photo of the last hat that was offered. If you get here quick enough, you may still be able to get it for free. She lists all of the ones for this month at the bottom of her post. 


I downloaded the Waves of Hope hat yesterday. This sweet, soft looking hat was designed by Christine herself. I think it's absolutely adorable! Just remember to put the code in before completing your purchase and it will show up as free. Then put it through and save it in your files. This one came with a little video how-to as well. I've learned a lot of new stitches by participating in this Challenge over the years. It's been fun!


Sweet Potato 3 also has a Facebook page. I find that's a great way to never miss any new posts while the Cancer Challenge is on. 


So if you like to donate some of your creations, this is perfect and it helps so many!! I see the 6th hat has been posted so go have a look! It's an adorable warm looking hat designed by Sara and Helen at  Sunflower Cottage Crochet for free in exchange for your pledge to make and donate one hat to a cancer patient or center! There are some really cute patterns on their page as well!

I can tell Fall is settling in. My crochet hooks are calling, and so is my sewing machine....I will be posting some super cute quilt blocks soon (I'm chomping at the bit waiting for my fabrics to arrive).

See you soon,


Blessings,
Carmen

Apr 7, 2020

Check Out Krista's Note Cards and more!

Hello,

I hope this post finds you all doing well in spite of this self isolation we are all experiencing. I'm very much an introvert (who loves to visit and have coffee) and I don't mind this at all. I do like to get out for a bit, but then I'm good! Most of my DIL's are extroverts, but one in particular is very extroverted, and this is HARD for her! Ah well, this too shall pass! 

Anyway, I received a delightful message from a blogging friend, Krista Peterson Hong from Krista's Paper Cafe, who used a few of my Digis to make note cards and she sent the link to me (as I've often requested you all to do when you use my digis) so that I could enjoy them too. I just feel so incredibly happy when people find a use for my digis and I was so pleased to hear from her. I love what she's done and wanted to share it with you too.

As I've mentioned in past posts, all the digital stamps on my blog are now completely free for download. There are all types of them, so please check them out. 

Krista has been following me for ages, and I her - because her blog is awesome! There's a link below to the blog post where she's made the most adorable little cards. I love the fact that she took a Digi I made, broke it up and used it in a different way. What a great idea! It's one of those moments where you think, "why didn't I think of that?" 

As a side note, if you check out my page headings above - the page called "Digital Stamps Info & Terms" explains exactly how to do what Krista did. Please do check it out, especially if you've shy'd away from trying digitals. They are so easy to use and you'll be glad you did! So many fun options!

Here is Krista's post: Birds and Sun. Spring Has Sprung!

Here are the digital stamps she used if you'd like to make your own. As you can see, she split these up into individual birds. Awesome! 


She also used these which are a bit of a different style....but still fun. I'm a bit quirky at times and my digitals display that quality. No apologies. 


Ok, it's time to go back into isolation! But before I do...check out these Easter images on my blog for a quick card, place card, or banner. Is it April already?


I should really do up a religious one. 

Anyway, thanks for stopping by! Have a great week!
Blessings,
Carmen

Mar 23, 2020

ALL FREE DIGITALS!


Hello,

How is everyone doing in this strange world right now? Here in British Columbia, Canada we are in a state of emergency over 13 deaths from Covid-19 (10 from one facility), but my son is a respiratory therapist and he says it truly will be a problem if people don't isolate. They expect our numbers to be like Italy's numbers in a matching amount of time. So we are hunkering down! The fact is, I've been sick a lot this year, which is very unusual for me, but I am fine. It's mild. 

Anyway, I got off on a bit of a tangent. I'm actually here today to mention that I have gone through this blog in the last month or so and removed the watermarked images, and replaced them all with the free images. 

EVERY DIGITAL IMAGE ON THIS BLOG IS NOW A FREEBIE!!

This includes vintage graphics and other freebies. There are duplicates sprinkled here and there, but that is because when I was selling them I sometimes offered time limited freebies. Feel free to scroll through. There may be something here for you. 

I had started a page some time ago outlining all the freebies I did have available. However, rather than update that list, if you just go to 'freebies' 'digital stamps' or 'vintage graphics' in the sidebar, they should all pop up. There will be many of them, but that's the easiest way to find them. 

Here's my last couple of cards:


Thanks for stopping by!

Blessings! 

Sep 25, 2019

Curvy Girls Cards, free sentiments

Hello!

How I love this time of year! There's a nip in the air, the leaves are starting to turn and everything feels fresher. Sometimes I feel like Vianne in Chocolat. Have you watched that movie? I'm a seasonal crafter, you see. I find it hard to do arts & crafts in the summer, but the Fall, Winter and Spring are fair game. It's like the Craft Wind is calling, and I must yield!

Anyway, enough of that. I found a little company/blog called Stamping Bella. They have a set of stamps called Curvy Girls that I fell in love with. I ordered three of them and received them a couple of weeks ago. So I had to play --


I decided to make some clean looking cards with these. 


I like the sentiments that came with them too. 
However, this next one has a sentiment on it that I made up. I can't sell them because of some copyrights, but I can give them away for free -- check below.


Here's the third one. I love the coffee ones the most! 


I should also mention that the Stamping Bella site has a Youtube channel where they show you how to color with Copics. The only drawback is that you'd have to have the Copics to do it, but I still found it fascinating to watch and very helpful (I have a mixture of Artist Loft and Copic markers).  If you want to have a look, the channel is called Marker Geek.

Now for the free sentiments --

Please note: the backgrounds of the images on google have been changed to black. This means that because this is a transparent digi (so that you can print it on any color of paper), you will not see the black lines of the text. Just click on the image below, it'll take you to another page that looks blank. Right click on the middle of the page and 'save image as,' choose the file you want to save it into. When you use the image in a Word Document, the image will show up because the background will be white instead of black. So, no you won't initially see it, but yes it is there!


Thanks for stopping by! 
Blessings!

Feb 26, 2019

Puzzle Piece Sentiments

Good Morning,

The other day I showed you some of my Craft Sale Haul which included a puzzle piece punch. Today I thought I'd offer a few Puzzle Piece Sentiments for use on your cards or scrapbook pages. 

I intend on using these myself for a few cards which I'll post soon.


If you use these, please send me a photo of your project and I'll add it at the end of my puzzle card post as inspiration for others. I'll include links to your blog page if you provide it. You can also post it yourself under the comment section if you prefer.

For helpful information on how to download a digital stamp and store it, that information is posted under my Blog Header under  'Digital Stamps'. Please have a look. 

Thanks for stopping by,

Blessings, 
Carmen