Whether I’m sewing, crocheting, card making, painting, or doodling, I’m always making something here in Kamloops, B.C. Don’t forget to check out my free digitals and vintage graphics while you’re here. Enjoy your visit!
Showing posts with label tutorial. Show all posts

Dec 8, 2022

Cupcake Mug Rug

Good morning crafters! 

Today I have a cupcake pattern that can be made into a mug rug, a coaster, or whatever you choose to use it on. A T-shirt maybe? Your imagination is the limit. Mine was part of a birthday gift.

I chose to turn it into a mugrug, and I’ll include a template for the cupcake below. 

It is a pretty simple piece to make. All I needed was some scrap fabric and batting. 


The completed mugrug


For this mugrug I used mostly materials I had on hand. 

Supplies:

Cupcake pattern (below)
Fabric scraps for cupcake base and frostings, cherry or heart
Heat n bond - I used ultra hold. (for cupcake pieces only)
Backing fabric and batting each  9.5” x 5.5”
Front square- 5.5” x 5.5”
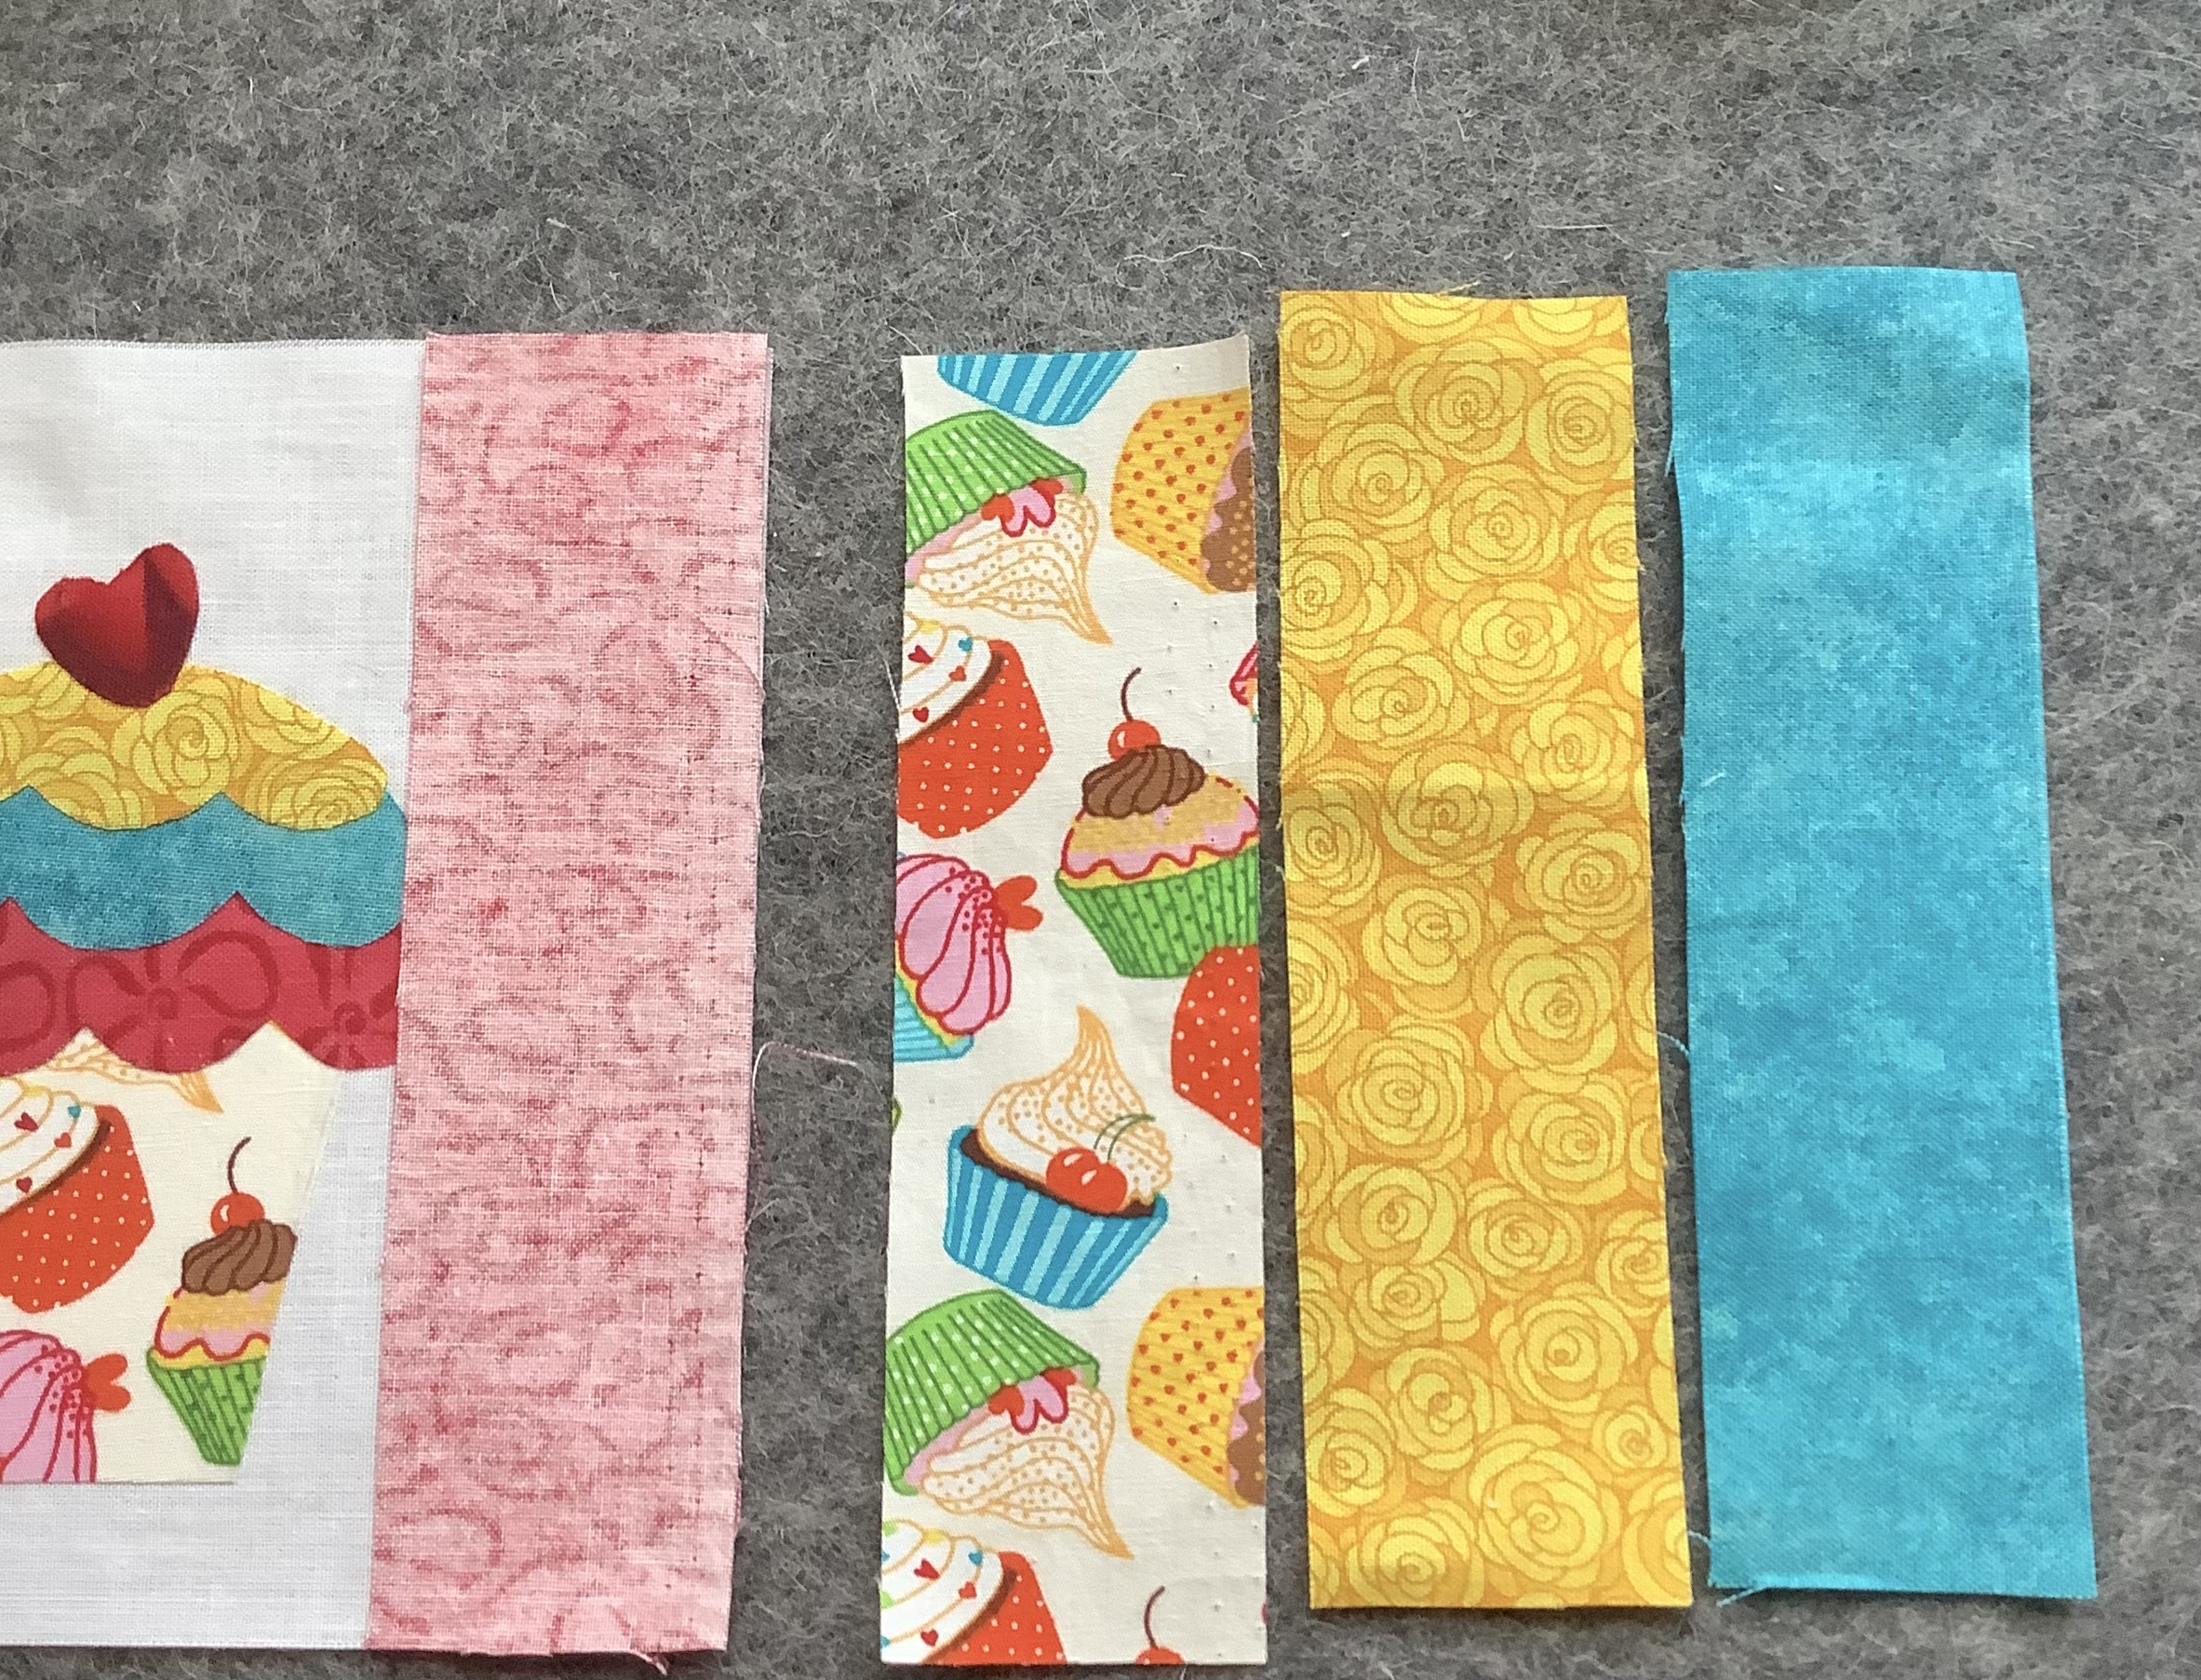
4 matching strips of fabric - 1.5” x 5.5” 
Approximately 45” binding fabric, 1.25” wide
Embroidery thread and needle.
(Iron, scissors, rotary cutter, square quilt ruler, thread, sewing machine with optional quilting foot)

Instructions

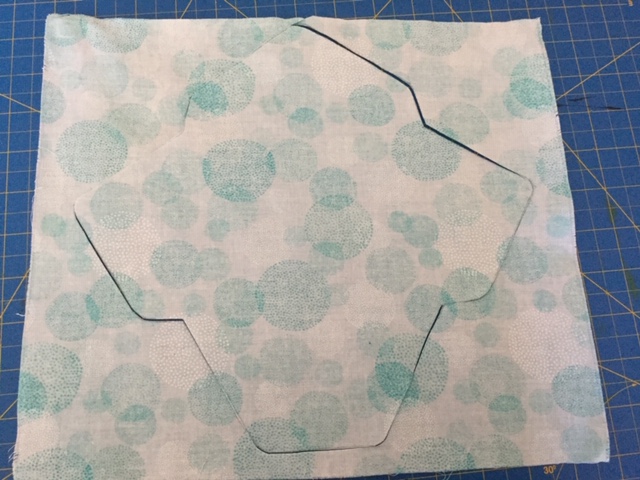
Print off each pattern piece on to cardstock, then cut them out.

Trace pattern pieces for cupcake onto the paper backing of the heat n bond. 

Cut out the heat n bond pieces allowing extra for a bit of a border around each piece. 

Lay the pattern pieces on chosen fabric pieces for cupcake (back side of fabric facing glue side of heat n bond) and iron into place. 

Cut out the pattern fabric pieces on the lines. 

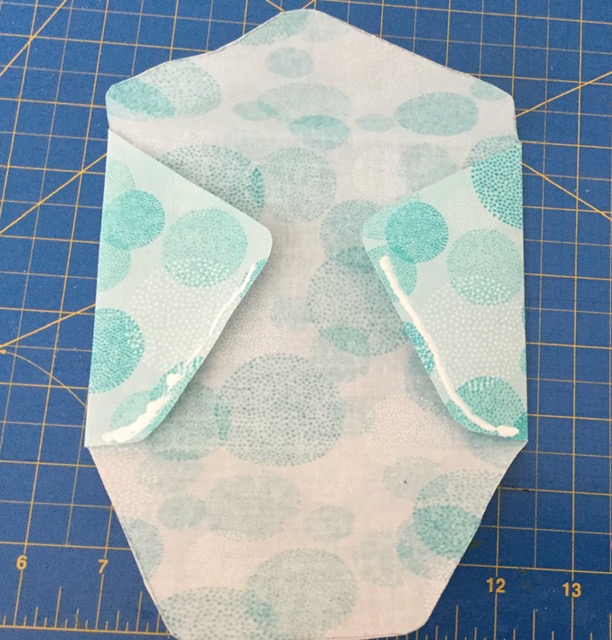
Position your cupcake pieces on 5.5 x 5.5” fabric. 

(You can add the batting and do some quilting on the background for the cupcake, or leave it. I chose to leave it.) 

Remove paper backing and iron down each piece of the cupcake.

Add your batting and stitch them in place starting with the cupcake liner..
** with the ultra hold heat n bond you don’t have to stitch them in place.**

If you’ve used the cherry you can embroider a little stem in the top of it. 

Your cupcake side of the mugrug is done

To complete right side of front: 

Stitch 1.5 x 5.5” strip to right side of cupcake square (batting in place)  right side to right side, iron down over the seam. Do the same for remaining 3 strips.

Using a quilting ruler, square edges and cut any excess. 

Lay backing fabric wrong side up. Place your front piece and batting on top, right side up. 

Using a quilting ruler, square edges and cut any excess. 

Sandwich your mugrug for binding:

Place clips or pins to hold them in place. (You can stitch the edges if you like, a scant 1/8” seam)

Place your binding on the front edge and stitch in place using 1/4” seam.

*Binding will be folded in half lengthwise, then folded to the centerfold on each side and ironed in place.
(If you’re unaware of how to bind, please check YouTube for a short tutorial. It’s easy!) 

Hand stitch the binding back side, if you prefer not to stitch it in with the front. 

Done!


Click on the image above and print. This image can be sized larger or smaller. 

It looks like we are full swing into the Christmas season. If you want some recipes, decor, ornament and other ideas, check out my Christmas Sleigh Ride posts. 


Thanks for stopping by!
Blessings,
Carmen

Dec 1, 2022

C2C Cupcake Security Blanket Free Pattern

It’s December first and true to the time of year, it is freezing outside. BRRRR!  The best place to be is inside where it’s warm and cozy. I’ve been using this time to sew, crochet and make cards. Today I will share one of my cupcake themed projects with you. 

This is a corner to corner security blanket. When completed it is 25”x20”, which is a bit larger than a typical security blanket. You could make it smaller by removing 2 or 3 rows all around, or add more rows to the outside and turn it into a stroller blanket at 30”x35.” It’s so easy to do that with these graph patterns.

I’m in the process of blocking it, but you can see how the pattern turned out. I made it for my great granddaughter, who is almost 11 months old now. A happy little bean! 

I apologize for the sun rays…it was difficult to get a true color photo. 


This was the pattern I used. I have written out the counts for this pattern for myself and can print them up for you. However, I no longer have the grid pattern, other than this photo of it. However, if you click on it, it’ll bring you to a larger version of it. You can then take a screenshot and print it from there. 
One thing I did differently was instead of using a double crochet, I used a half-double crochet because I thought it would make a thicker blanket. If you use a double crochet, you’ll end up with a bigger blanket as well. 

(To use a half double crochet in this pattern, the chain 6 becomes a chain 5, and the chain 3 becomes a chain 2)

I made some minor changes to the pattern afterwards, which you’ll see below.  The cherry is slightly smaller. I have not written up the count for this one. 
I’ve included a link of this pattern for you below. I believe you can print it from there if you’d like to try it. 


That’s all for today. I hope you have a wonderful weekend,
Blessings, 
Carmen

Oct 12, 2020

Refreshing Old Coasters - Fun, Quick and Easy!

A few years ago my daughter-in-law brought me a couple of cute little coasters that came from the Real Deals Home Decor store where she worked in town. Real Deals is a really neat store because it has the most interesting things to look at, both large and small pieces. Every time you go in there it's a cornucopia of goodies to behold, but I'm not here to promote them. I'm here because I want to show you what I did with the little coasters she bought me. 

Over the years they just got worn out and I threw them in a drawer for a while until I felt like doing something with them. Today was that day. I love them! There's a bit of a reflection of the coffee cup on the coaster. 


This second picture shows you the coasters before and the designer cardstock I chose to cover them with. I really love this design on masculine cards too. As you can see I used some smaller pieces I had in my stash.


I turned the cardstock over and with a pencil traced around the coaster, cut them out and used this spray adhesive I had in my stash to adhere them. That's the back of my oil painting palette - it was handy.


Once I got the adhesive on I pressed the cardstock into place and made sure it was on there really well. Then after a few minutes I sanded the edges down. 


I made up some mod podge with the Glue-All I had on hand. It's about 2 glue to 1 water for ratio. 


Once that was all good and dry I used a spray gloss varnish over top. I know store bought mod podge is a sealant but I'm not sure how good the home made ones are and I'll be putting hot things with the ability to spill on them, so better safe than sorry. Besides, I had to varnish a painting so I did it all at one time. 

Here again are the completed coasters. 


You know, I have some tiles that are waiting for some dressing. They'd make great coasters with a bit of felt on the backs. Maybe one day soon ~ ~


Have a great week and Happy Thanksgiving!

Carmen


Aug 8, 2020

Fabric Envelopes - Cute Little Gift Idea

Hi there,

I was looking on Pinterest for some donation ideas and came across a tutorial by Celebrate Creativity for fabric envelopes and thought I'd try making some.

I'm going to take you through the steps here even though she's done that too. Here's a photo of a small stack of them. 


First of all, I didn't go and buy any decoupage solution because it's so easy to make. You just use glue and water. That's it. I did about a half and half mixture, using a bit more glue than water. 

I grabbed an envelope and tore it open to use as a template. My envelope fit in a space about 11' X 11." I have pieces of leftover fabric that are a bit larger but too small for pouches and bags. I also had a piece of fabric that is larger, but it's been in my stash probably 20 years. I decided to use it as well and make several the same. 
I covered my workspace with wax paper and put my ironed fabric on top of it. Using a foam brush I covered the back of the fabric, and then the front with decoupage solution. I put enough on to cover each side without using too much. You'll have to judge for yourself. Just go for it - it'll be fine.

Then I made a makeshift clothesline in my craft room and hung them to dry. I actually did that first, but you know. 

I understand this is quicker than leaving them on a flat surface. You want them to be as straight as possible....it's not easy. Don't judge. LOL. 
It only took these about an hour to dry.

Then I took the envelope, outlined it with a pencil on the back side of the dried fabric and cut it out. I don't recommend a pen or a marker as it'll bleed through.

I used my cutting mat as a guide to make the folds as I wanted them as even as possible, but you can go commando with it if you want to. It seems pretty forgiving.
I put my glue on the side flaps, because I wanted the bottom piece over top. It's really up to you how you do it. However, be careful when putting on the glue as it's easy to use too much, or put it too high on the side flaps. You can see I had to start a bit lower than you'd think. 

Don't ask me how I know that (oopsie). 

When I glued it I put a little card down the inside of the envelop to keep the glue from getting everywhere. It wasn't really a problem, but better safe than sorry.

Then I just had to let it dry for a bit. 

And, they're ready to gift...


Oh, I also made little blank note cards for inside of them. A gift ready to give! All they have to do is fill in the card.

These were actually fun to make once I got everything set up. It's a quick little craft and they make great 'just because' gifts. These are probably not suitable for sending in the mail, but definitely good to give by hand. You could embellish them with ribbon or a flower or something, maybe more for if you're giving one filled out as a card. I kind of like them plain with a ribbon tied around the stack of them. 


I actually had pictures of 4 different note cards I took, but you really couldn't see the detail since they were white on white. This picture turned out better, so I'll just show you this one in the envelope.
You know, I kind of like these.  I might have to keep some to give away myself. 

Yes, I think I will. 

Thanks for stopping by!
Blessings,

Jul 31, 2020

Feature Post: Gelli Feathers

Hello,

How is your 2020 summer going? Here in the 'Loops it is really heating up with temperatures of 40C (104F), which is about normal for this time of year. I am enjoying our first summer with a central air system. Good Lord, what a treat that is. Hoo boy -- heaven!

I've been looking around and found a post by Birgit Koopsen, who is a Gelli print artist. She decided to do Gelli Feathers and I fell in love with them. My post today is a link to her video of how to gelli print feathers. 

You know, I don't have a gelli plate but am seriously considering getting one. I love these feathers and think they'd be great on cards amongst other things. So many craft ideas, so little time!


Enjoy the video and thanks to Birgit for sharing this fantastic tutorial. Birgit has a blog as well named 
Birgit Koopsen. Just click on her name to see it.

Thanks for stopping by on this hot summery day,

Blessings, 
Carmen

Aug 25, 2019

Prairie Bonnet Tutorial

Hello,

It's been an unusual, but enjoyable and full summer. We have had so much company and have been away quite a lot. My husband has been at his job for years and has a lot of vacation time to use. While my son and his family were here, his daughter asked me to make her a 'prairie bonnet.' As she is only six years old, I thought it a strange request, but I guess it's because they watch Little House on the Prairie. I was more than happy to oblige and actually made her one right away, which she has taken home now--but I promised I would make her another one that was more in the fabric style of the era.


There are not many free patterns available for a prairie bonnet online, but this is the one everyone seems to be having good luck with.

I used a pattern by Given Moments. She gives you the measurements she used, so you have to draw it up yourself. Here is mine for reference. I cut out rectangles for both first, and drew in the curves freehand. It's easier than you think, and if you use a pencil, you really can't go wrong.

The crown piece is 7 inches by 14 inches. (fold on long side). You cut one.
The band is 3 1/2 inches by 9 inches. (fold on short end). You cut two plus the interfacing.
(I used a medium weight fusible interfacing)
The ties are 2 inches by 18 inches. You cut two.
Cut an 8 inch piece of 1/4" elastic for neck portion.


My next step was to iron the interfacing onto the backside of one of the band pieces. 

Then I ironed a seam on both pieces of the band and pinned them face to face, before doing any sewing - as seen below. This is a step that will save you time later and make it easier. 


Next I sewed along the curve of the band, clipped the curved portion and pressed it. Do not do your top stitching yet.


Next let's move onto the hat piece. 

I ironed a seam in place along the straight bottom piece. I folded this one twice as it will be a casing for an elastic band. I folded it about 1/2 inch twice, so an inch altogether. The seam folds were about a 1/2 inch each fold.


Next I sewed two lines of long stitches from the bottom to around the curve of the hat so I could gather it later. You can do just one line if you want, but I did two. Be careful not to sew over the casing. 


I then sewed the casing at the top of the fold, about an 1/8 of an inch in.


One of the things I did differently was to use the whole bottom of the hat as a casing for an 8 inch elastic so that the whole neck part was gathered with an elastic. It was easier for me to do it this way and it looked neater and made for a nicer fit, in my opinion. 


Once the elastic was part way in, I tacked it in place on one end and proceeded to pull it the rest of the way through, tacking it in place with a few stitches at the other end as well.


Both ends done.


Now I was ready to gather the curved part of the hat. The gathered curve of the hat will need to match the opening of the band. 


Like so......


Pin the band onto the hat, or rather, pin the gathered curved portion of the hat in between the seams you created on the band with the iron earlier. You will have to play with the gathers a bit and make it all fit right, but it's not hard, just a bit finicky.


Then stitch it all in place. As you can see, the stitch line is close to the seam, just make sure before sewing that the front and back of the band line up well. I did two lines of stitching here too. 

Top stitch the curve of the band at this point. It gives a nice finished look. 


Now you're ready to do the ties. As you can see below, I've also ironed the seams on both ends here. It's much easier to do that at this point than later.


Now fold each one lengthwise, right sides together and stitch along the long edge. It's kind of hard to see, but you can see the start of the stitching on the seam in the photo. Turn them inside out. Finger press, iron and stitch along the edges of all sides of the tie. 


When that is done, you can sew one end of the tie onto the band. Check placement below. Make sure that the band is overtop the tie (the tie is sewn on the inside of the band). I just stitched over the stitching that was already in place and made sure I went over it a couple of time to hold the ties in place well.


It should look like this:


Here is the finished product. I'm using a ladies size foam head, so it's a bit tighter. 


A close up of the neck portion for the inquisitive.


Okay, that's about it. I hope that my instructions are fairly clear for you. I'd be happy to answer any questions if you have them.

If you do use this tutorial, please remember to thank Sara over at Given Moments. She is the one that drew up the original pattern for all of us to enjoy. I just wanted to show you how I put it together.

Have a great day! 

Blessings, 
Carmen