Good morning crafters!
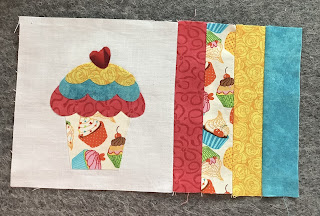
Today I have a cupcake pattern that can be made into a mug rug, a coaster, or whatever you choose to use it on. A T-shirt maybe? Your imagination is the limit. Mine was part of a birthday gift.
I chose to turn it into a mugrug, and I’ll include a template for the cupcake below.
It is a pretty simple piece to make. All I needed was some scrap fabric and batting.
The completed mugrug
For this mugrug I used mostly materials I had on hand.
Supplies:
Cupcake pattern (below)
Fabric scraps for cupcake base and frostings, cherry or heart
Heat n bond - I used ultra hold. (for cupcake pieces only)
Backing fabric and batting each 9.5” x 5.5”
Front square- 5.5” x 5.5”
4 matching strips of fabric - 1.5” x 5.5”
Approximately 45” binding fabric, 1.25” wide
Embroidery thread and needle.
(Iron, scissors, rotary cutter, square quilt ruler, thread, sewing machine with optional quilting foot)
Instructions
Print off each pattern piece on to cardstock, then cut them out.
Trace pattern pieces for cupcake onto the paper backing of the heat n bond.
Cut out the heat n bond pieces allowing extra for a bit of a border around each piece.
Lay the pattern pieces on chosen fabric pieces for cupcake (back side of fabric facing glue side of heat n bond) and iron into place.
Cut out the pattern fabric pieces on the lines.
Position your cupcake pieces on 5.5 x 5.5” fabric.
(You can add the batting and do some quilting on the background for the cupcake, or leave it. I chose to leave it.)
Remove paper backing and iron down each piece of the cupcake.
Add your batting and stitch them in place starting with the cupcake liner..
** with the ultra hold heat n bond you don’t have to stitch them in place.**
If you’ve used the cherry you can embroider a little stem in the top of it.
Your cupcake side of the mugrug is done
To complete right side of front:
Stitch 1.5 x 5.5” strip to right side of cupcake square (batting in place) right side to right side, iron down over the seam. Do the same for remaining 3 strips.
Using a quilting ruler, square edges and cut any excess.
Lay backing fabric wrong side up. Place your front piece and batting on top, right side up.
Using a quilting ruler, square edges and cut any excess.
Sandwich your mugrug for binding:
Place clips or pins to hold them in place. (You can stitch the edges if you like, a scant 1/8” seam)
Place your binding on the front edge and stitch in place using 1/4” seam.
*Binding will be folded in half lengthwise, then folded to the centerfold on each side and ironed in place.
(If you’re unaware of how to bind, please check YouTube for a short tutorial. It’s easy!)
Hand stitch the binding back side, if you prefer not to stitch it in with the front.
Done!
It looks like we are full swing into the Christmas season. If you want some recipes, decor, ornament and other ideas, check out my Christmas Sleigh Ride posts.
Thanks for stopping by!
Blessings,
Carmen


No comments:
Post a Comment
Thanks for the comments!