Whether I’m sewing, crocheting, card making, painting, or doodling, I’m always making something here in Kamloops, B.C. Don’t forget to check out my free digitals and vintage graphics while you’re here. Enjoy your visit!

Nov 28, 2024

The Best Sofa Station

Hello,

Whenever I’m sewing I usually have other people in mind, but my last project was all about me. 

Since I’ve been making the Peek-a-Boo Dolls, I’ve found myself doing a lot of the hand stitching in my comfy chair. As a result my little side table would get clogged up with pins, embroidery thread, felt pieces, scissors, etc., leaving barely enough room for my coffee or tea. This wasn’t working for me, so I found a lovely pattern from ArabesqueScissors for a Sofa Station. 

This is not a beginners pattern in my view, and although it isn’t difficult, in hind-sight, I found it difficult because of the variety of options in the pattern itself, making for a lot of little pieces to navigate. It comes with differing pockets and flaps, and it’s your choice as to which to make. 

Ultimately, considering that, I believe it was well written and I’m not sure there was an easier way to present it. In addition she provided videos on how to do each part, including making your own bias tape and clarity on how to use the magnets. I found these to be extremely helpful. 

This is mine:


The unique thing about the Sofa Station is that it fits over the arm of your chair. So I’ve shown you each side separately to start with.


This side has a place for scissors, pens, seam rippers, stitch markers, clips, rulers or whatever. 


 The other side has a large open pocket for patterns or pattern pieces, and a second pocket for my crochet hooks. I do enjoy crocheting now and then, so I decided this could come in handy for me. 


One of the very unique features of this pattern is that both the basket and the needle minder are magnetic. There are also options to make a magnetic pin cushion or thread catcher. I opted for the basket and the needle minder, but they’re all interchangeable, so you can make them all. 


I haven’t made a video in a long time and I just used my iPad, but wanted to show you the magnetic needle minder. I love this feature as I’m often putting my needle down and then losing it. Maybe it’s just me this happens to, idk, but I love this. 

In addition, there’s a little needle keeper made of wool felt,


I’ve draped it over my kitchen chair to give you an idea of how it will look on a sofa.
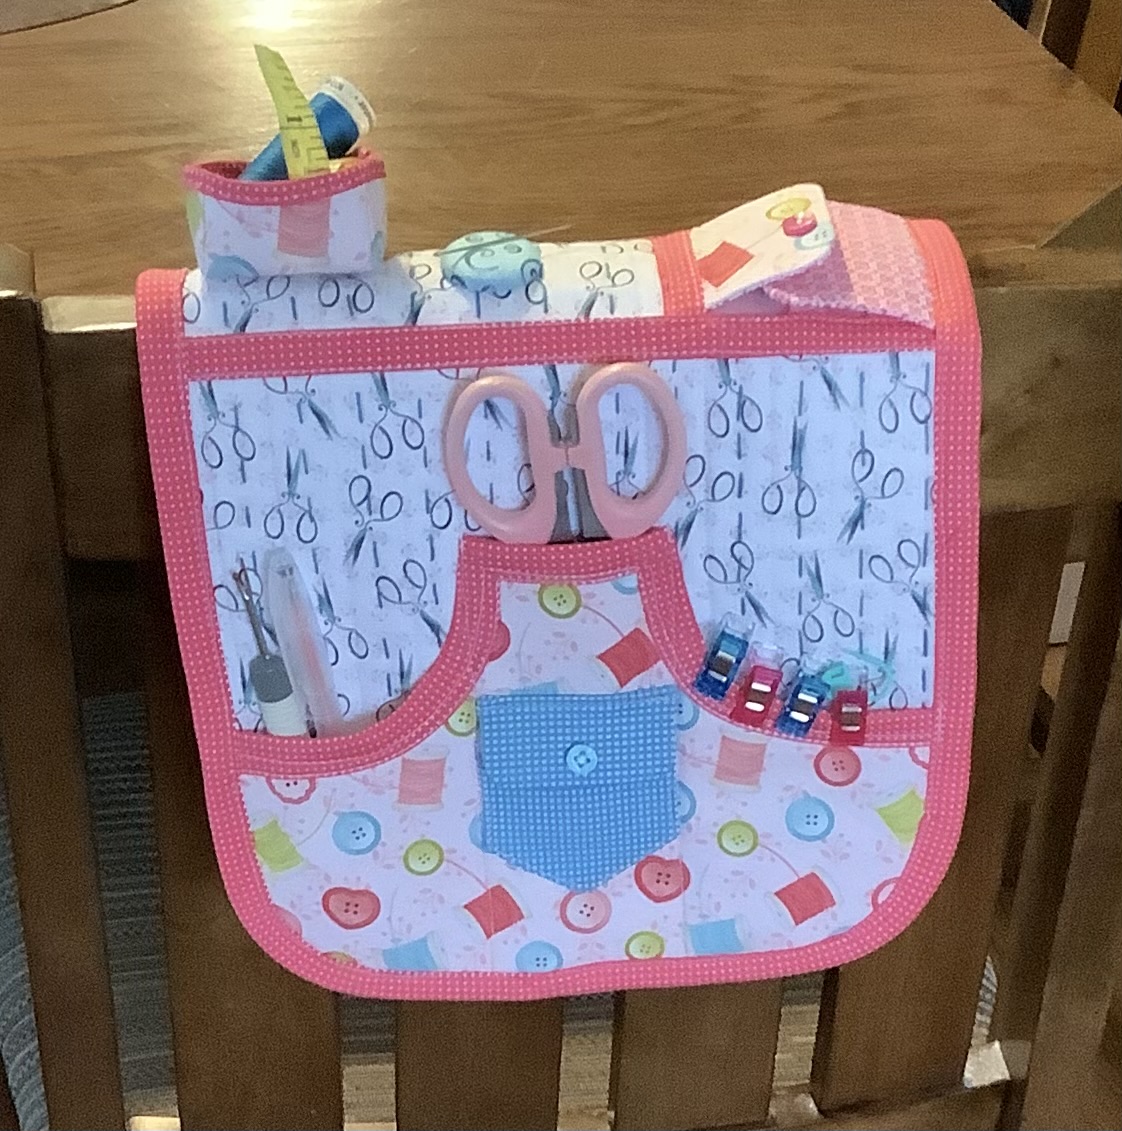


Overall, I’m happy with it. The next one will be easier. These will make great gifts as well, if you’re wondering what to get someone who loves to cross stitch, hand sew, knit or crochet. 

Thanks for stopping by!
Blessings,
Carmen


Nov 13, 2024

Primitive Ginger Bowl Fillers

Hello there, 😃

Do you remember these from my digital stamp days? 


I thought I would turn them into ornaments, or bowl fillers. 


The first time I make most things, I always seem to do something wrong, but that’s part of the process. After sizing and printing these off, I cut them out and then cut them out of felt. I then added all the eyes and the yummy little extras. Finally comes the stitching and lastly the stuffing. 


These are intentionally lightly stuffed. I may keep future ones without the stuffing.  They’d be great as a garland with felt balls or round felt cookies in between them. 

I showed these two to my husband, who said “their heads are a little small aren’t they?” Remember these are primitive gingers, not your typical gingerbread men. 

Well, that was fun. Hope you enjoyed them.

Have a great day,
Blessings,

Nov 1, 2024

I made a little booklet today…

Hi there,

One of my granddaughters is having a birthday rather soon - - she will be one year old. Her little cousin is almost three and they both live in the frozen north (Fort McMurray, Alberta). Since I’m making some peek a boo dolls, I decided to make a couple for the one year old for her birthday, but didn’t want to leave the three year old with nothing (since they’re often at my sons place together.)


So - - - 
I made a little book. 

This was made with one piece of 12 x 12 cardstock, and filled with various papers. I included a bunch of stickers I just bought online, and a few other things. 


That’s the front- kind of plain but it’s for a three year old so best not to 
put a bunch of stuff on there she could potentially choke on. 


The stickers went into a ziploc bag and into the front pocket. 


The digital image behind the paper can be traced onto the tracing paper. 
Then she can color the actual image if she wants to. 

Two of the pages flip out. I used washi tape to do that. 


This is the same idea as the tracing paper, except now it’s texture I’m featuring. 
She can take a crayon and color over it to get the grid to show through. 


I didn’t photograph them all, but there are various stickers throughout the journal,
And I’ve included some other papers as well. Plus she can stick her other stickers into the booklet. 

It’s really just a little thing, but hopefully she likes it. I usually add a little snack too. 

I completely forgot to take a photo of the spine, but I got the idea from this YouTube video by Treasure Books. These are mostly journals for adults, but I downsized it for little hands. 

Hope you enjoyed! Thanks for the visit!
Blessings,
Carmen

“The blessing of the Lord enriches, and He adds no sorrow with it” Proverbs 10:22

Sep 13, 2024

Quick Cards and September Musings

Whenever I need some quick cards, AI art is my go to. It’s so quick and easy! But don’t worry, I still like to make up my own. 


This one I embellished with a few metal pieces out of my stash. See if you can find them.

August was a busy month, but we never did get a baby. He showed up 12 days later on September 5th. He’s a cute little guy and looks just like my son. My poor DIL went through the mill, but both mom and baby are fine. 

 I took this picture after the cards were put in to the plastic sleeves because I was in a hurry that day. I’m also showing you the inside of these. 


Well, that’s it for today. I hope you’re having a good weekend. 

Blessings,
Carmen


Sep 10, 2024

Little Projects for Kids

Hello friends,

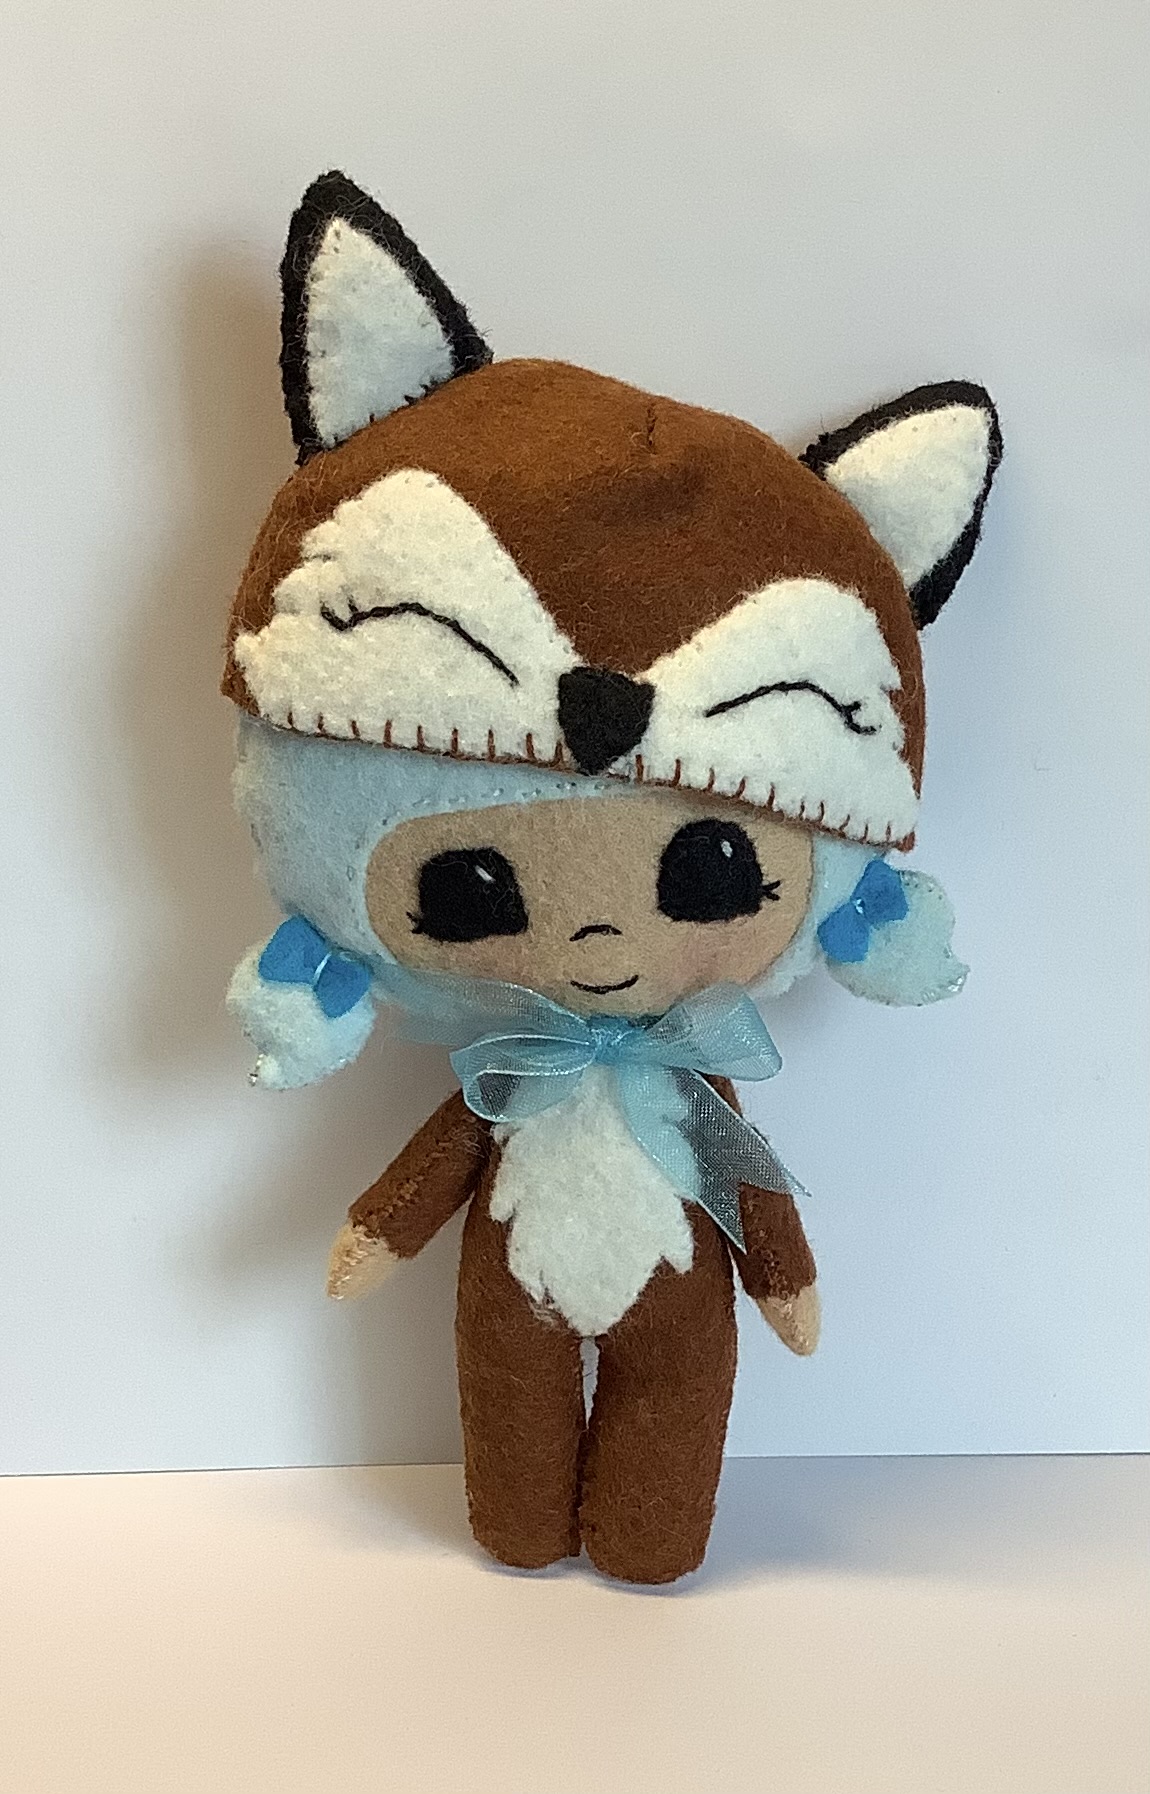
September is here and I’m starting to feel like sewing again. I know I’ve been quilting all year in the midst of card making, but I love me some small projects. Especially cute little things for kids. I love making these super cute felt dolls.


What I find so adorable about these little dolls is the removeable hats. 
Absolutely darling!
You can find these at Gingermelon on Etsy.


Another project I made was this little tiger pouch. 


This is another project I love too. I’ve made this one before, then altered it to make 
a unicorn pouch and a lamb pouch. I haven’t made the lamb pouch yet. Maybe soon. 
This one is from Stubbornly Crafty on Etsy. 

You never know what I’ll do next!

Hope you all have a wonderful week! 

Blessings,
Carmen

Sep 5, 2024

Birthday Celebrations with Mugs and Gemstones!

Good morning,

We recently celebrated my husbands 65th birthday! Two of our boys are in town, so we all went out for dinner with them and their families. We had such a wonderful time. 

Two of our younger grandkids made us each a mug. I just love these - I’m pretty sure they make our coffee taste even better! 


I also made a birthday card for my husband. He’s a gemstone faceter now - a hobby he picked up before retirement, but that he’s perfected over the last three years. I’ll share some of his stones with you too. In addition, he’s become interested in old pocket watches. When his uncle was still alive, he gave him all his watch making tools. That was my reason for this particular card. 


To be fair, he looks much younger than this bearded fellow, but that’s the image I had. 

These are some stones he’s faceted. He goes by bcstonecutter on Instagram if you’d like to look at some of his other work. 


This owl design is named “Notolla” by Marco Voltolini
The stone is Titanium Sapphire
Faceted by Graham Gamble


The cut is a “Round Honeycomb” design by Michiko Huynh
The stone is a Lab Czochralski Pulled Pink Sapphire.
Faceted by Graham Gamble


Design is “Heart and Soul” by Michael Edgett
Titanium Sapphire
Faceted by Graham Gamble


Design is “Radiant Eye of Zul” by Arya Ahkavan
Bicolor teal and purple Flame Fusion Sapphire
Faceted by Graham Gamble


A modified rendering of “Spellbound”
Lab Flame Fusion green Sapphire
Faceted by Graham Gamble

He cuts both man-made and real gems. If you’re interested, please check out his Instagram listed above.

Thanks for visiting,

Carmen

Sep 1, 2024

Birdy Anniversary, AI

Good morning,

Just a couple of quick shares. These first two are similar. I love the saying because it’s fairly versatile and will work for different types of cards.


This last one is a nice masculine card for almost any reason. Just because, graduation, birthdays, Father’s Day…


I think the biggest struggle with the AI images is that most of them are square, but cards are usually rectangular. I kind of struggled with this card because of that, but it’s ok.


So that’s it for today. When I print these off I use standard paper on high quality, but I put cardstock in the printer. That seems to work best for me. If I use glossy or photo paper, the print doesn’t show up as well. Idk if that’s just my printer, but that’s what I have to do to get a good quality printout. 

Thanks for stopping by,

Carmen

Aug 28, 2024

Tweet as Honey Completed

Good day!

I mentioned in one of my last posts that my youngest son got married recently. We decided that in addition to money, we would gift them one of the quilts I was working on. It was near completion and took a year. Mostly because the patterns came out one per month. I had made most of the blocks but had to put the backing on and free motion quilt it. They’re applique quilts and I’ve realized I love applique, so these were fun to do. 

I’ve already shared a few of the blocks on this blog,  so I’ll just link them here. 


I never did post the last set and side panels, but you’ll see them all here.

This is them laid out on the floor before stitching them together, and before the binding, backing and quilting. 


These were the side panels. All I had done here was cut them out and pressed them onto the panels. Yes, there are three irons in that picture. Yes, I need them all! 😉😉


Here’s my super adorable little iron close up. Isn’t it cute? It’s great for small pieces. I intend on trying some collage work soon so this will really come in handy. 


In addition to applique, this quilt also had quite a bit of embroidery work. I love doing embroidery and took up Brazilian embroidery some years ago which certainly gave me an advantage. I’ve included a few samples below. 


Finally,  here is the finished quilt with the backing, binding, and free motion quilting. You may have to zoom in for the quilting. 


To finish it off I added some information on the back of the quilt. It actually can be machine washed, but since it’s raw-edge applique, I thought hand washing would be better. 


Thanks for stopping by,

Blessings, 
Carmen