
Hi there,
I was looking on Pinterest for some donation ideas and came across a tutorial by Celebrate Creativity for fabric envelopes and thought I'd try making some.
I'm going to take you through the steps here even though she's done that too. Here's a photo of a small stack of them.

First of all, I didn't go and buy any decoupage solution because it's so easy to make. You just use glue and water. That's it. I did about a half and half mixture, using a bit more glue than water.
I grabbed an envelope and tore it open to use as a template. My envelope fit in a space about 11' X 11." I have pieces of leftover fabric that are a bit larger but too small for pouches and bags. I also had a piece of fabric that is larger, but it's been in my stash probably 20 years. I decided to use it as well and make several the same.

I covered my workspace with wax paper and put my ironed fabric on top of it. Using a foam brush I covered the back of the fabric, and then the front with decoupage solution. I put enough on to cover each side without using too much. You'll have to judge for yourself. Just go for it - it'll be fine.
Then I made a makeshift clothesline in my craft room and hung them to dry. I actually did that first, but you know.
I understand this is quicker than leaving them on a flat surface. You want them to be as straight as possible....it's not easy. Don't judge. LOL.

It only took these about an hour to dry.
Then I took the envelope, outlined it with a pencil on the back side of the dried fabric and cut it out. I don't recommend a pen or a marker as it'll bleed through.
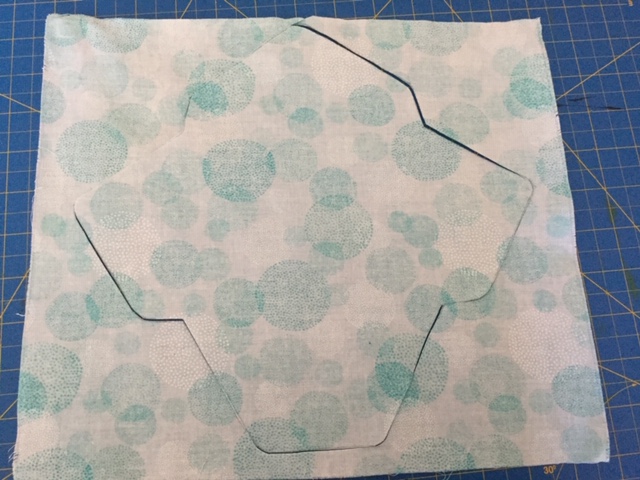

I used my cutting mat as a guide to make the folds as I wanted them as even as possible, but you can go commando with it if you want to. It seems pretty forgiving.
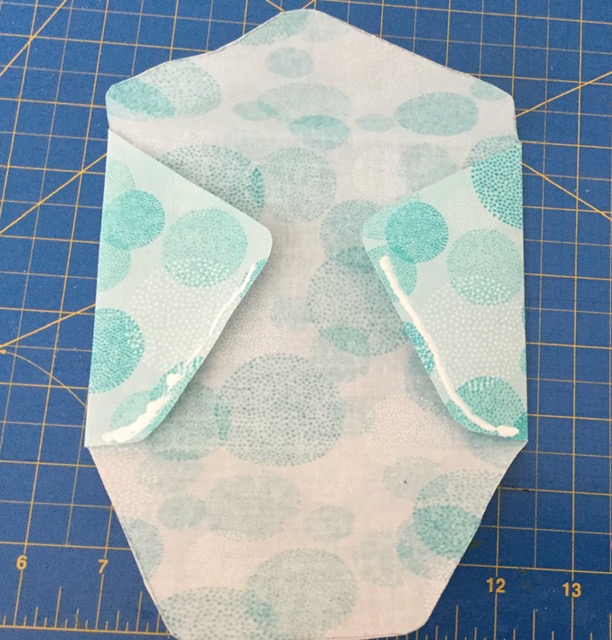
I put my glue on the side flaps, because I wanted the bottom piece over top. It's really up to you how you do it. However, be careful when putting on the glue as it's easy to use too much, or put it too high on the side flaps. You can see I had to start a bit lower than you'd think.
Don't ask me how I know that (oopsie).
When I glued it I put a little card down the inside of the envelop to keep the glue from getting everywhere. It wasn't really a problem, but better safe than sorry.

Then I just had to let it dry for a bit.
And, they're ready to gift...


Oh, I also made little blank note cards for inside of them. A gift ready to give! All they have to do is fill in the card.
These were actually fun to make once I got everything set up. It's a quick little craft and they make great 'just because' gifts. These are probably not suitable for sending in the mail, but definitely good to give by hand. You could embellish them with ribbon or a flower or something, maybe more for if you're giving one filled out as a card. I kind of like them plain with a ribbon tied around the stack of them.

I actually had pictures of 4 different note cards I took, but you really couldn't see the detail since they were white on white. This picture turned out better, so I'll just show you this one in the envelope.

You know, I kind of like these. I might have to keep some to give away myself.
Yes, I think I will.
Thanks for stopping by!
Blessings,
What a wonderful wee project Carmen - I may just have to try that, but not until I have moved and settled!
ReplyDeleteStay safe
Blessings
Maxine
Oh, I hope your move goes well! These are fun to do! I hope you try it!
DeleteA lovely idea.
ReplyDeleteThank you Krista!
Delete