Whether I’m sewing, crocheting, card making, painting, or doodling, I’m always making something here in Kamloops, B.C. Don’t forget to check out my free digitals and vintage graphics while you’re here. Enjoy your visit!
Showing posts with label applique. Show all posts

Nov 13, 2024

Primitive Ginger Bowl Fillers

Hello there, 😃

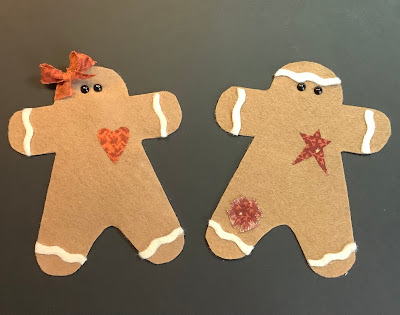
Do you remember these from my digital stamp days? 


I thought I would turn them into ornaments, or bowl fillers. 


The first time I make most things, I always seem to do something wrong, but that’s part of the process. After sizing and printing these off, the second stage is cutting them out for a pattern and then (3) cutting them out of felt. The fourth stage is adding all the eyes and the yummy little extras. I decided not to use buttons on these because I didn’t have any small enough and these are my test patterns anyway (Maybe sometime in the future). Finally comes the stitching and lastly the stuffing. 


These are intentionally lightly stuffed. I may keep future ones without the stuffing, I don’t know yet.  They’d be great as a garland with felt balls or round felt cookies in between them. 

I showed these two to my husband, who said “their heads are a little small aren’t they?” Remember these are primitive gingers, not your typical gingerbread men. 

Well, that was fun. Hope you enjoyed them.

Have a great day,
Blessings,

Aug 28, 2024

Tweet as Honey Completed

Good day!

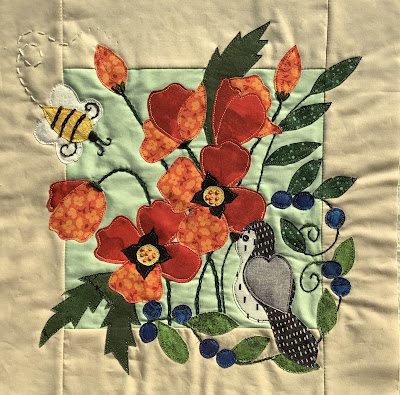
I mentioned in one of my last posts that my youngest son got married recently. We decided that in addition to money, we would gift them one of the quilts I was working on. It was near completion and took a year. Mostly because the patterns came out one per month. I had made most of the blocks but had to put the backing on and free motion quilt it. They’re applique quilts and I’ve realized I love applique, so these were fun to do. 

I’ve already shared a few of the blocks on this blog,  so I’ll just link them here. 


I never did post the last set and side panels, but you’ll see them all here.

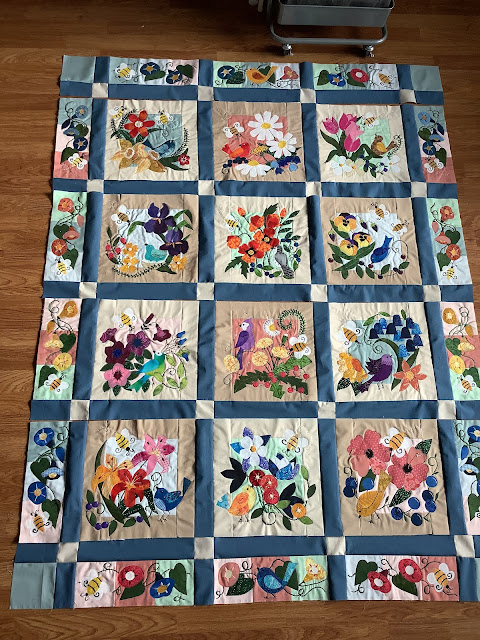
This is them laid out on the floor before stitching them together, and before the binding, backing and quilting. 


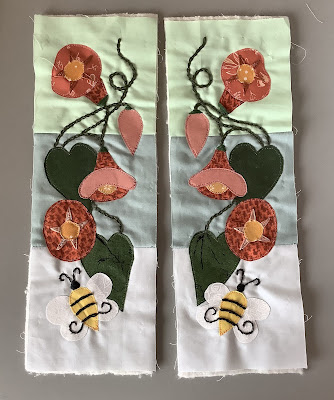
These were the side panels. All I had done here was cut them out and pressed them onto the panels. Yes, there are three irons in that picture. Yes, I need them all! 😉😉


Here’s my super adorable little iron close up. Isn’t it cute? It’s great for small pieces. I intend on trying some collage work soon so this will really come in handy. 


In addition to applique, this quilt also had quite a bit of embroidery work. I love doing embroidery and took up Brazilian embroidery some years ago which certainly gave me an advantage. I’ve included a few samples below. 


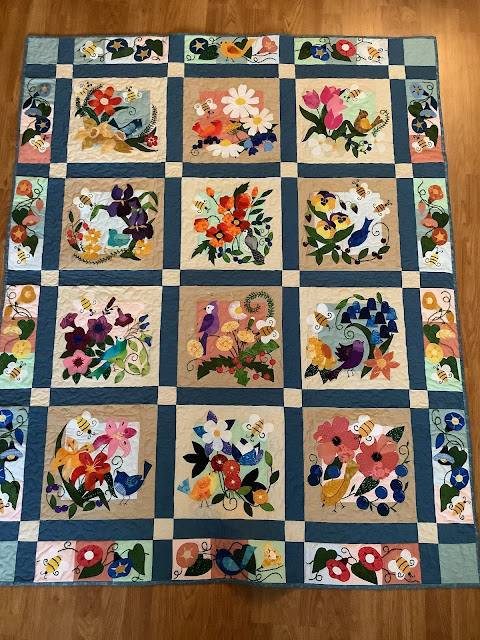
Finally,  here is the finished quilt with the backing, binding, and free motion quilting. You may have to zoom in for the quilting. 


To finish it off I added some information on the back of the quilt. It actually can be machine washed, but since it’s raw-edge applique, I thought hand washing would be better. 


Thanks for stopping by,

Blessings, 
Carmen


Feb 19, 2024

Retro Flash 3

It’s a sun shiny day here in the Loops. I’ve been busy sewing and am working on a 50’s quilt from Susie’s Sitcom called Retro Flash. I shared a few of the blocks in other posts here and there, and today I will share the last three blocks. 

I have yet to put the back on and quilt it. Then the border. It will be a large wall hanging as it’s raw edge appliqué. One new thing is the flash blocks, which were not yet applied to the other blocks, but have been added since I posted them. The instructions for them came with the last block. 


The border will be a stripe fabric that’s been incorporated in some of the other blocks as well. 

Once this one is finished I’ll be completing my Tweet as Honey Quilt, also from Suzy’s Sitcom. I just enjoy appliqué quilting, but I’ll be ready to do some collage and fabric cards after that. No more big projects for me for a while. 

My cards are getting really low, so I’m hoping I can get a few more made in between some of the sewing.

Thanks for stopping by and have a good week,
Blessings,
C~


Nov 25, 2023

Retro Flash 2

Good morning,

It’s been a very busy couple of weeks in this household, but I did manage to slip in some cutting, sewing and embroidering. I absolutely love these quilt patterns I’m working on. If you like sewing, applique and embroidery, these will fit the bill. The best part is that I was able to get each block pattern for free from Suzy’s Sitcom. She has many free patterns which come out every month. Do check her page out. 

This quilt reflects life in the 50’s, when bowling, jukeboxes and crazy color combos were the thing. 


Who wants to go bowling?


These big jukeboxes were so popular. 
Later they were replaced by little individual jukeboxes at each diner table.
 Remember? So fun!


And here’s your typical living room setup. The only thing missing is the standing ashtray. 
Love the TV rabbit ears and the old phone. No selfies back then!
 The ‘stylish’ lamp takes me back to my earlier years. 

A couple of progress pics…before the embroidery.


I’ve really enjoyed working on this quilt. Only three blocks to go, then the finishing. This one is raw edge, but I’m going over the edges with invisible stitching so it doesn’t fray. 

I’ve also completed another Tweet as Honey block and have two more blocks to go for that one. I’m guessing I’ll finish them both around the same time. I’ve also got some other patterns and things perking in my noggin. Hopefully I’ll get to some of those soon too. 

Well thanks for popping in and have a wonderful weekend,
Blessings,
C~

Nov 11, 2023

Retro Flash!

Hello,

As promised I’m sharing a few blocks from my Retro Flash applique quilt which is a work in progress. This quilt has only 9 blocks and these are the first three I made. I will be securing the edges of the applique with a zig zag as well, but for now I’m getting everything in place. 

This block takes place at the Drive-in movies!  I have memories of almost driving away with the speakers still inside the car and having to back up to place them back in their holders. Some people snuck in extra friends in the trunks of their cars; plus who can forget the snack bar where you could get all kinds of goodies? Those were the days, but by the time I experienced them it was about 22 years later! I loved putting together this block. So much detail!


Next, the old time diners, but those that had drive thru’s were a new thing!


This block really goes back to before my time. A waitress came out to deliver your food in roller skates. Imagine the skills they needed. The trays attached to your drivers window which had to be open to hold them. A little chilly some days perhaps, but oh, the nostalgia of it all. 


I’m working on the next two blocks already. One is bowling, and the other is a jukebox.  I have received my next block for the Tweet as Honey quilt, so once I complete these two I’ll start on it too. I’m finding that I enjoy working on more than one quilt at a time as I get bored easily. 

I noticed these pictures are a bit dark, so I apologize for that, but it’s 4:30 and with the time change I forget how quickly it gets dark out now! Hopefully the next lot will be a bit brighter. 

Stay tuned for more quilt block fun coming your way! And yes, hands off my scissors!!!
Thanks for stopping by!
Blessings,

Carmen

Nov 2, 2023

Tweet as Honey 3

Good morning,

November is here - - already! This year has flown by for me with all of its ups and downs, but ultimately life is good. There is a bit of a nip in the air some days, and I’m spending more time indoors than usual. Lately that means I’m getting much more sewing done. I’m here to show you the last 3 blocks in my ‘Tweet as Honey’ sew along by Suzy’s Sitcom. 


It’s early here so the lighting is a bit low, but they showed up ok. I have 3 blocks and some side panels left to do on this one before I can put the back on and quilt it. I do all my quilting by free motion as I think it adds a personal touch. You’ll note that this is an appliqued quilt which features some embroidery as well.

If you’d like to see the other blocks I’ve done for this quilt, click on ‘sewing’ under labels in the sidebar or at the bottom of this post. You can also search for ‘Tweet as Honey’ in the sidebar. 

I’m working on another of Suzy’s quilt patterns as well called ‘Retro Flash.’ It’s a delightfully fun themed quilt from the 50’s. Poodle skirts, Drive Ins, and jukeboxes are just some of the blocks included. I’ll include some of those blocks in my next post. 

Thanks for stopping by!

C~


Aug 20, 2023

Tweet as Honey 2

Hi,

I’m popping in today to show you the progress on my Suzy’s Sitcom quilt “Tweet as Honey.”The first post is here if you’d like to see the first 3 blocks.

Suzy always seems to have a few quilts available as a sew along - free on a monthly basis. If you miss a month, the block pattern is available to purchase at a minimal cost. If you prefer you can buy her quilt patterns outright and work at your own pace. I’ve participated in two of her quilt sew alongs and absolutely am loving it. 

Here are the last three blocks I made. I’m doing raw edge applique. There is lots of embroidery work on this one too, which I enjoy. 


You’ll notice I haven’t quilted the backgrounds yet. There’s definitely some puckering from the embroidery, but that won’t be a problem once I get the quilting in place. There will be sashing in between each block. Then I’ll have to figure out how I’m joining them. 

There’s also some edging included…one on each side every three blocks. 


I hope this one turns out as good as the first one did. 
Anyway, thanks for stopping by,

Blessings,
C~

Jul 10, 2023

Tweet as Honey

Some time ago I shared a Quilt with you called Seagulls Paradise. This quilt was a Sew Along designed by Suzy at Suzy's Sitcom. Recently I embarked on another one of her Sew Alongs. This one is called Tweet as Honey. Today I am sharing a few of the blocks I've put together so far. If you'd like to go to Suzy's Sitcom, check the sidebar for a link.

Here are a few of my blocks. What I like about these is that they involve quilting, applique and embroidery work. You end up with a quilt that is unique to you. I have not done any free motion surface quilting yet as I will do that once the other elements are in place. I used raw edge quilting, but am a bit nervous about that, so might go over the edges with a zigzag. 


These last two panels are for each side. There are also more of these coming. 

Suzy offers one block a month, each free for a month. If you miss any, you can purchase them separately. If you like, you can purchase the full pattern as well. I enjoy doing the one block a month and getting the pattern for free. I’m a bit behind on this one because I was busy with other projects when this one started up, but I saved them to my files each month. Suzy also  has a Fb page on which people share their interpretations of the blocks from all the quilts she’s offered over the years. There’s a 50’s one I’m sure I will make sometime. I’m just saving the blocks as they’re released for now.

Anyway, do check her out if you want a project to make. She also offers other crafts on her site. People make small quilts and pillows and table runners, etc. with her patterns. Super fun!

Have a great day,


Apr 27, 2023

A Little Stitching

Good morning,

What a wonderful day it’s been here in Kamloops, BC. Sunny skies, warm temperatures and a backyard full of concrete blocks. There’s music playing as ‘Bear’ is working hard putting up our new retaining walls. My husband finished off faceting his gemstone before heading out to help in the back. There’s a large box full of upholstery samples staring at me from my craft studio and my sewing machine is humming as I run through some fabric. It’s a busy day. 

The samples were a trade from my friend Tina, who needed a larger piece of upholstery fabric to do a couple of her chairs. We both paid very little for what we had and so it was more than a fair trade for me. I decided to make expandable utility bags. These are used as travel shoe bags, or can be used for knitting needles, to gift wine, or whatever really. I made them in a few different sizes. 

Now that I’m using more fabric in my artwork, I’m thinking of making more pouches as well. I really do go in cycles with my arts & crafts. Anyway, before I get too behind, I thought I’d post a few pictures of what I’ve done so far. 

Here are a couple of pouches.


This is a canvas bag with fabric backgrounds stitched on. Free motion quilting was used for the dandelions and the wording. I added some decorative machine stitching, a piece of lace and a little bit of hand stitching for interest. This bag was inspired by Stitches by Julia, but I made up my own pattern. 


This is another canvas pouch. I used applique and free motion stitching on this one. I made my own pattern. 


This is the back of the pouch. Some free motion stitching. I have someone in mind for this one. 

Now onto a more serious bag. These are made with upholstery samples. The first picture is of 15” medium size bags. I used #5 zippers on most so they’re very sturdy, and the fabric is sturdy as well.


The photo below is of 18” bags. They will fit pretty large shoes, and probably more, if need be. 


This next photo is to show you the 15” bag expanded. They’re about 3” on each side. It is not full by any means, but you get the idea. There’s a big box of upright thread in there.


So yes, I’ve been busy. I’m not sure what to charge for these, but they’d come in handy for several things. Plus they each have a sturdy handle made of webbing.

Well, that’s it for today. Hope you’re enjoying life a little more these days. There is always something to be thankful for, even when life seems difficult. Focus on the good things.

Thanks for stopping by,
Carmen

Mar 11, 2023

Fabric Postcards 2.0 (freebie)

Good morning,

Some new postcards sprung up out of my sewing machine recently. This first one is a combination of applique with ribbon embellishment and homemade fabric word phrases. I made up the postcard backs myself and printed them off. The fabric word phrases and how they’re made are discussed in THIS post. 


The backs are finished off by turning the fabric to the back (used some light heat n bond as a temporary fixture), ironing it in place and then a simple stitch all the way round. The postcard backing was attached with an iron, but I added some glossy accents to the perimeter of the card so it’ll hold well on the edges. 


These next ones were fun to make. As you can see they’re finished off with binding, but I again turned the fabric to the back, ironed it in place then ironed the postcard back on top glueing the edges with a thin strip of glossy accents. 


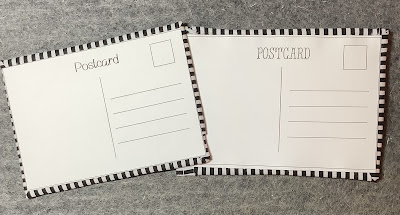
When I made up my own postcard backs I didn’t want anything fancy but fairly simple and so made up the ones in the photo directly above. 

Here is a copy of them if you'd like to print them off to use on your project. Just click on the image below and it'll take you to another page, you can print them off from there. These are made for 4"X 6" postcards.


I also made two cards with some fabric art on them. I used Karolina b craft as inspiration for these two. I like to make them as she’s done them, then I’ll branch out from there with my own designs. I did add some word inspiration. 


These were each fastened to an off white card backing. (One was taken in darker surroundings but it’s the same card set). I used a tip from my friend Diane at The Beaded Lime (check out her gorgeous art work). She used carpet tape to fasten these on to her cards. Cheap, and believe me when I tell you it will NOT come off. Lol.

Well thank you for dropping by, tell your friends about the freebie.
Blessings,

Carmen