Whether I’m sewing, crocheting, card making, painting, or doodling, I’m always making something here in Kamloops, B.C. Don’t forget to check out my free digitals and vintage graphics while you’re here. Enjoy your visit!
Showing posts with label Christmas. Show all posts

Dec 12, 2024

Country Christmas Table Decor


Hello there,

There’s quite a bit to unpack in this post. I loved my primitive digital stamps and decided to make some felt ginger prims out of some of them. Dried orange slices have always appealed to me, and then I found these primitive candy canes. Plus, you know I’ve made soap and salves in the past - - so now I am trying to make my own toxic-free cleaner. 

Believe it or not, out of all that came my table top Christmas decor. 

If you’d like the link to my Ginger Prims above, they were made from my digital stamps here. Just click on the image, and print from the new page. The Primitive Star Snowman is here

The orange slices were super easy to do. I don’t have any photos of the process because it’s so simple. Cut the ends off an orange, cut a bunch of quarter inch to half inch slices and put them on a cookie tray. I used foil under them, I believe. Turn your oven to 200 degrees Fahrenheit and turn them over every 45 min or so. I think they were in there for at least 3 hours. I just kept checking on them.

Just note that if you do leave them in the oven too long, or cut some too thin, as the slice in the back, they will turn a bit brown on you. 


I’m happy with these though. 

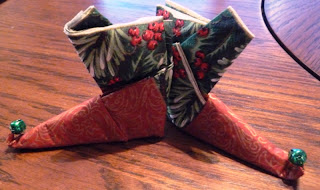
The candy cane idea was a Pinterest find. I picked up some plastic candy canes from the dollar store, took a bunch of leftover quilt batting and twisted it around the cane starting at the crook, hot glueing it here and there as I went along. The start and end are a bit tricky, but doable. Then I took a strip of fabric and twisted it around my fat little cane in much the same way. There are YouTube videos of the process here, and the chunky ones here

You may be wondering about the cleaner, as I mentioned above. We have a large spruce tree out back, so my husband cut some branches off for me. However, I was convinced I needed pine branches, so off he went into the woods to find pine trees and he came back with a bag of branches for me. Sweet, right? 

In the end, the spruce branches had a better scent, imo, but I decided to do both. In addition I added orange peels to another mason jar as well. Once the jars were stuffed full of branches and orange peels, I added white vinegar. Also from the dollar store, since it’s just for a cleaner. Will it end up being too vinegary? Perhaps, but vinegar is a good cleaner and dissipates once dry. Plus I can add pine or orange essential oils if I decide the vinegar is overpowering. You do need to be aware of what you don’t want to use this cleaner for - - - like wood for instance, but it’ll make a great kitchen and bathroom cleaner. 


Then came the fun part. Sprucing up the jars with different elements. The rusty bells and rusty stars I got off Temu. The strings were in my stash. Oh, and the little berry wreath on top of the large mason jar was a dollar store purchase. As was the berry wreath on the table.  Notice I added some fabric strips and some cinnamon sticks as well.  


I may still add something on top of the lids, or I may leave them. I haven’t decided. 


I love my little Ginger prim man and woman. 


And of course my primitive star snowman. 


Here it is in all its primitive country glory. I guess it’s fair to say I’ve been keeping busy. I love this little set up. It’s different and welcoming. All I need now are some primitive looking place settings. 

Thanks for stopping by,

Carmen


Nov 13, 2024

Primitive Ginger Bowl Fillers

Hello there, 😃

Do you remember these from my digital stamp days? 


I thought I would turn them into ornaments, or bowl fillers. 


The first time I make most things, I always seem to do something wrong, but that’s part of the process. After sizing and printing these off, the second stage is cutting them out for a pattern and then (3) cutting them out of felt. The fourth stage is adding all the eyes and the yummy little extras. I decided not to use buttons on these because I didn’t have any small enough and these are my test patterns anyway (Maybe sometime in the future). Finally comes the stitching and lastly the stuffing. 


These are intentionally lightly stuffed. I may keep future ones without the stuffing, I don’t know yet.  They’d be great as a garland with felt balls or round felt cookies in between them. 

I showed these two to my husband, who said “their heads are a little small aren’t they?” Remember these are primitive gingers, not your typical gingerbread men. 

Well, that was fun. Hope you enjoyed them.

Have a great day,
Blessings,

Dec 18, 2023

Little Gifts in Little Booties

I was scrolling on Instagram and found the cutest little containers for little gifts or candies. The best part was that it was cheap to make and so easy! The original post was made by Maria Bauer, and I’ll post her profile link below. I’m going to show you the ones I made first. 


Cute, right? Little booties with little gifts! I love them! I’ll show you how they’re made.

Supplies:
Paper cups 
Napkins
Tape
Glue
Cardstock 
Scissors
Ribbon

You’ll notice I had to cut my cups down an inch or so. I could only find tall paper cups at the dollar store. 


I opted to make little bottoms for my boots. These were made by tracing the bottom of the cup, and adding a little loop at the front. This is for the toe part of the boot. This is also an optional step. It will work without a sole. I beaded a bit of glue around the bottom rim of the cup and added the sole. 


Next I placed the cup on a napkin like this, then scrunched up another napkin for the toe of the boot. 


Next I pulled the napkin at the front of the boot over the rim of the cup, pushing in a bit at the top of the toe round, and then taped that into place on the inside of the cup. That’s enough to hold it in place while you pleat and fold the napkin into the cup all the way around. 

The toe part is a bit tricky but just play with it until it looks ok. This is how one of mine looked before I taped the inside of the cup down a bit better. I did the front part first, but whatever works. 


More tape wherever you think it’s needed. There’s the inside of mine. It doesn’t matter that it looks messy because the kids will take the gift and candy, and the boot will eventually be thrown out with the wrap. 


And here it is with the ribbon on. If you’re good with tying bows, 24” will do you. If you struggle, cut 30”. You can cut the tails down after. 


Then comes the really fun part where we fill it with candy and gifts. Two of these have gifts included, and two are going to be included with gifts and only contain chocolate, candy canes, gummies, etc. If you are giving gift cards or jewelry, etc., these are perfect for teens or kids. 


I opted to throw these in a see-through Christmas bag. I still have to tie them, but cute, right?? 


Hope you try to make your own. As promised, here’s the link to Maria Bauer at Maria’s Foodstyle. You’ll find a little video there as well which may be easier for some to follow along with. 

Thanks for stopping by !
Blessings to you this Christmas,
C~ 


Dec 3, 2023

Quick Christmas Cards 2023

Hello all,

To be honest, I wasn’t going to make Christmas cards this year. Twice, I went to the store and looked at boxed cards and came away without a purchase. Then I looked at my old partially used Christmas paper pads and guilted myself into making some quick cards. I made 4 cards one day, 8 the next and I have 3 on the go today. 

Am I impressed with myself? No, not really. My tastes have changed over the years. I raised 4 boys and now that I’m in an empty nest everything looks much too cutesy. I wanted elegant, but that wasn’t happening with these papers. Lol. 

The boys have grown up and apparently I have too? Maybe?  Anyway, I was committed to using these papers up, so off I went into a crafting frenzy. 

The background was supposed to look warm and fuzzy. Instead it looks like dirty snow. Sorry. 🤦🏻‍♀️ Can’t win ‘em all.

T


I have 12, almost 15 done in 3 days time, but I need 25. Will I make more, or will I end up at the store again? 

I really don’t know.  I guess we will all find out soon. 

Hey, thanks for stopping by!
Blessings,
C~


Nov 19, 2022

Christmas Bookmark Cards

Last year I found a cute stamp on Pinterest called “Peaceful Night” from Woodward Crafts. It was too late to do anything at the time, but I ordered it and kept it for this year. 

These stamps are beautiful on cards done up with only gold or silver embossing powder, but I decided on white embossing powder and then painted them. 


I made the cards about the size of the clear stamp itself and ended up with a very slim card, about 6 1/2“(folded to 3 1/4) by 8 1/2”. I cut out an even slimmer inside panel wide enough to use the greeting which also came with the stamp.


Since I only have fairly standard sized envelopes, I came up with a possible envelope solution for these slim cards, but had to check the post office site first. Would they accept the envelopes I had in mind? 

Why yes, they would.


The photo above shows you the cards, the inside panel, clear envelopes and white paper. 

That’s correct, clear envelopes. 

I had bought bookmark sleeves a while ago for my envelope add-ins. I sometimes add a bookmark and a bag of tea to my cards to mail away. The clear sleeve helped keep them from slipping around.  These sleeves were also the perfect fit for the Christmas cards. 


I slipped a white piece of paper over the top of the card. This paper will contain the address and return address. The stamp will go on the top right so it can be cancelled. 


The back is fine as is. The envelope will be taped down on the back side. 

So these are my Christmas Bookmark Cards. They can be enjoyed as a card, then slipped into a book as a bookmark. 

I love it when my cards are re-gifted, framed, or can be used in another way. I’ll be looking for more tall skinny stamps to use in a similar way.

Will you? 

SUPPLIES LIST

White Embossing powder
Versamark ink
Watercolor paints
Cardstock in black and white

Blessings, 

Carmen

May 24, 2022

Stamperia Leftovers Cards

Hello all!

Today I have some Stamperia cards, watercolor bookmarks (in progress) and a little idea. 

A while back I bought a bunch of Stamperia pads and they didn’t disappoint. In fact, the cards I’m about to show you were made from mostly bits and pieces that were left over. I usually make larger cards, but these are smaller cards, which are nice to give too. 


I cut out the little teacups, the birds, the heart and the love sign and applied them with foam tape.


This one was super simple. It’s just two flat layers with a popped up flower.


This one was embellished with a metal music note clip. I did have to use two different background papers for the background. Super easy though! This is what I love about these papers. They’re incredibly easy to work with; the cards seem to make themselves.

I also made some watercolor bookmarks. I’ve already given some away, so these are ones I’m still working on. Once I’ve done the initial painting, I go back and add details, usually with golds and iridescent colors. In fact, I want to share a couple of really nice paints below. First the bookmarks. 


You can see the gold splatters on the center bookmark. I’ll be adding writing and some shimmer to the other two before they’re completed. 

The reason I am making these bookmarks is because they make such a great addition to cards. I add a packet of fancy tea and a cute little saying, and it’s a little bit of a gift. 


This is the front of the bookmark, and the back of the bookmark is behind the tea in its package below.


Note also the writing on the sticker that seals it. 
You time! A book, a sip of tea and solitude!”

You see, everyone seems to be stressed and depressed these days. People are worn out, feeling helpless and hopeless because of the things happening in the world. On top of that are the every day issues that come up in their personal lives, plus unusual sicknesses and outside pressures and it’s all just too much. I feel it too. 

I believe the best way to fight these feelings is to come together in unity.  Do what we can to encourage, lift people up and let them know someone out there still cares. It’s a small gesture, I know, but it’s a start. A handmade (or store bought) card with a bookmark and tea. Or maybe hot chocolate. Whatever. 

Just something to tell them you care, and to take time for themselves to relax, heal and get rejuvenated. So that’s my little idea. Super easy to do but thoughtful.

So about the shimmery paints. When I was going through my rock painting phase a while back (so short I never shared it), I was introduced to a couple of acrylics that are just lovely. A picture is probably best. Sorry about the yellow background…it’s watercolor paper. Anyway, if you want a little shimmer, these are awesome! I used the dragonfly glaze on the dragonfly bookmark above.


I have a fabric card ready, but I’ll wait until the next post. Hope you enjoyed these. Have a great week! 

Blessings,
Carmen


Nov 17, 2021

Christmas Sleigh Ride 2021


Hi everyone!

We’re going on a Christmas Sleigh Ride!

This is the first sleigh ride post this year. As before, I look around the World Wide Web and try to find some fun and useful ideas for Christmas. I wouldn’t say 2021 has behaved itself, but we’ll see if we can perk things up.

Christmas Gnomes are all the rage now. So I’ve found this little tutorial on how to make your very own Christmas gnome in 5 easy steps. And they are easy, cheap to make and adorable!


Happy Hooligans thought they’d invite the kids to play along and make a bunch of super cute gnome ornaments. It’s a fun project and something for them to do while on Christmas holidays. 


Although it’s lovely to look out the window and see the snowflakes dancing in the sky and covering the lawn in a blanket of purity…shoveling it will give you a pain in your back. I found a great recipe for bath salts you’ll love to soak in. 


These actually do sound amazing, and I think I have all the EO’s for these too!

The holiday season is always such a busy time and it’s easy to get overwhelmed and completely miss that warm cozy Christmas feeling. So I watch Christmas movies. I’ve included the Hallmark movie guide and am also including one for the kids!

2021 Hallmark Movie Guide- click the link to get a download of the guide.


Since we’re doing some things with the kids, here’s another super cute idea. There’s a little video included and honestly, these would be really cute to wear on your coat. You just have to attach a pin to the back. 


One of the ways we bring Christmas into our homes is by the decor we put out. There’s great ways to make things with what we have handy. Some Epsom salts, glue, a mason jar and a Christmas pick and we’re almost there! 


I love what you can do with barn wood for Christmas. Check these out…I love the rustic look, but the second one is beautiful too. I couldn’t find any sources for these, but they’re easy enough that anyone could make them just by looking at them. 


I don’t know about you, but I love to bake and Christmas baking is my favorite. I’ve shared my eggnog bread on this blog with you, and my fudge puddles. I found these recipes and haven’t tried them yet, but they look so simple! Who knew Jolly Ranchers would premiere in a cookie one day?

Stained Glass Cookies from Cooking Classy.


If you’re a no bake kinda cookie gal, here’s a recipe that may work for you.


This particular post got a lot of attention when it came out, and no wonder! Who doesn’t like elf boot napkins at the Christmas table? Super cute and easy. Depending on what napkins you use, you can get elegant to woodsy!


Last but not least, some cheery snacks!


That’s our Christmas Sleigh Ride for today. I hope you get a chance to try some of these ideas out!

Meanwhile, I’m off to work on another post!

See you soon,
Carmen