Whether I’m sewing, crocheting, card making, painting, or doodling, I’m always making something here in Kamloops, B.C. Don’t forget to check out my free digitals and vintage graphics while you’re here. Enjoy your visit!
Showing posts with label Tags. Show all posts

Aug 25, 2024

Wedding Tags, Favors and Bridal Dolls

Good day! 

It’s been a busy month with a celebration of life, an upcoming wedding, a 65th birthday and a new baby due, with a few other birthdays sprinkled in here and there. 

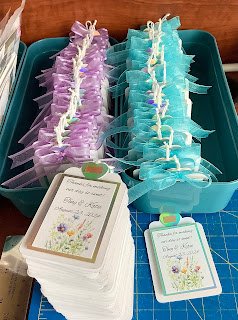
I was asked to make the tags up for the wedding favors for my youngest son’s wedding. Their theme is flowers, so I used a flower printable. They asked me to make them like some of my cards. Something like this card.


The tags were too small to add brads or gemstones, but the front is raised onto cardstock, and that was the main thing, I think. 


The white cardstock tags were cut on a silhouette by a friend. I did the flowered main piece with the writing on it in Inkscape, but you could easily use Word. I had irridescent cardstock for a backing on the flowered main piece. I taped these with dbl sided tape then put foam tape on the backside as shown. These were then centered on the blank tags. 


I was requested to put the ingredients of the cookies on the back of the tag. I typed these up in Inkscape and ran them off on sticker paper. This was the easiest way to do it. 

I wanted to cover the tag hole so I punched out some hearts to cover it using the irridescent cardstock. 


At first I attached the hearts with the embellishment tape, but realized it was making them too thick, so I used dbl sided tape instead. Prior to placing the hearts, I ran some cord through the hole so I could slip the twist ties through the cord (you’ll notice two knots about a 1/2” apart).


I made the bows with the instructions from a YouTube video using just your fingers. It was actually fairly quick. Unfortunately the bows did not want to stick. I used embellishment tape, and they’re sticking but they’re a bit fragile and can come off. I’m hoping they’ll stick well enough.  


I was going to use three colors of ribbon, but my third color never came, so we stuck with two colors and luckily I had enough ribbon in the two colors.

I had a hard time finding gussetted bags with a square bottom, but eventually I did find some in the right size. They’ll stand up on their own and that’s perfect! So here is a photo of the completed favors.


These cookies are gluten and dairy free and they’re truly delicious! The mother of the bride (Pam) baked up 460 of these right before the wedding. Then bagged them all into 2” gusseted bags. A true feat! They turned out super cute! 

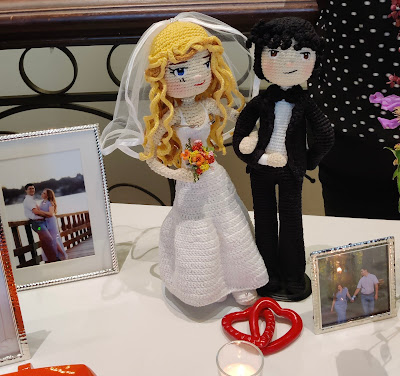
In addition, Pam, who is a fairly new crocheter, also did up these adorable bridal dolls that look exactly like the bride and groom. Aren’t they incredible? I’m thoroughly impressed and they looked so good. Here’s a couple of pictures ~~


With a close up….

Thanks for popping by! I hope your weekend was as amazing as ours was!!

Carmen

Oct 16, 2020

Super Quick Christmas Cards - Use up Your Stash!

I went to a garage sale in town last weekend. The home belonged to an elderly lady who had hired a company to go through and help her prepare her belongings for sale. When I got there it quickly became evident that she was a real shopper/hoarder. There were a lot of new things and a lot of duplicates. It really got me thinking. 

Recently I've had a few discussions over the concept of simplicity. People that have had to clean up family homes after they'd passed will often tell you they ended up having to throw a lot of stuff away. We came across the same issue with my mother and father-in-laws place. It was actually hard to do, but no one wanted it. Not even thrift shops. In our situation we were pressed for time as we don't live where they do, and the house had to be sold. 

With all that in mind I decided to make Christmas cards this year with what I had. No more new stamps or diecuts, no new papers or embellishments. Just use up what I had, even if they were simple cards. It's the thought that counts. Right? 


I pulled out this barely used paper pad by Recollections I got a few years ago on sale.


If you take a close look, you can see that not only are there background prints, but also some fun vertical prints and block prints. I chose some background prints and a vertical print for these cards.


 All I added was some pop up dots, some glue and double sided tape, and a bit of ink for the sides. That's it. 


I cut out panels for the front of the card. There was a strip of quotes at the top that I  trimmed and used for sentiments.


Then I measured out some background cardstock for the inside. I also cut some panels of white cardstock to write onto. 


I looked at my stamps and realized I have no Christmas sentiment stamps. I may have some digital ones, but I'll use them another time then. I'll just write these in. Here are the three cards. I could definitely embellish them with glitter glue or something else, but the fronts are already busy and so I'll leave them as is.

Using the same paper pad, I cut out a few of these blocks from another sheet.


In addition to being able to make cards with these, I thought these would make great mini cards for kids to make, or easy Christmas gift tags. Just cut out a white folded card base and adhere, or use as is with a hole in the top for the string. 

Many paper pads follow the same basic outline. You can often find pages that have vertical or block type prints on them that can be incorporated into cards or used as the main card focus. 

I'll most likely be making some special cards for people as well, but these are great in a pinch or for the kids or grandkids to give to their friends. 

It feels good to use up old stock!

Blessings,
Carmen


Oct 8, 2018

Thanksgiving Cornucopia of Crafts

Happy Thanksgiving Everyone!

Have you had your Turkey yet, or are you having it tonight? Is it Turkey, Ham, or ? I know in Holland people sometimes have Salmon for dinner on special occasions like Christmas, so it's fun to hear what people actually do. We had Turkey with trimmings and it was really quite exceptional this year. 

Then we all wanted to have a big snooze. Turkey, you know. It's mellowing.

I was texting with my DIL who showed me some place cards she had made for their thanksgiving table which inspired me to do something too. Now this was at the 11th hour, and I had to do something quickly. I had been to our local "De-stash the Stash Garage Sale" at the Kamloops Indian Reserve a week ago and found these cute little feather diecuts for a fraction of the price. I decided to play with them. I used leftover scraps of designer cardstock and found a free printable. I didn't do any measuring and pretty much threw them together with a bit of glue, some twine and dbl sided tape. 


It dressed up the plain napkins a bit and added a flair to the table. Afterwards I decided to throw them on the table along with the flowers my sweet hubby gave me. I love the fall colors! 


Double Duty. Works for me --

What else have I been making? Oh, let me tell you, I've been makin' and shakin' up left overs.

Here's the lap blanket I made with leftover yarn. It was literally a "how should I use these yarns up" kinda project. It's very warm and basically consists of double crochets. The picture's a bit dark, but you can see the nice thick baby yarn I used.


I was looking around to see what I could do to use up some smaller bits of yarn leftovers and found that our local NICU was looking for premie booties, hats, etc. They make up about 30 packages for premie babies around Christmas time. So far I've made these. The minion booties aren't quite done yet. 


To give you an idea of the size: 


I have fairly small hands to begin with. These are teeny tiny and they're so soft and cute. Made of wool and true hemp.

I also had some waterproof PLU fabric left from other projects so made a few wet bags. The zippers were 8" zippers my husband had picked up for me in Vancouver while looking for 9" zippers. He had forgot his glasses. They were perfect for this project. Yes, the joy of forgetting your glasses and ending up with short zippers. I've had these sitting around for at least two years so it was good to find a good use for them. 


This was another 'throw together' kind of project. I straightened the sides of the fabric, and then cut 2" off the top. The bags are about 9" wide and a bit longer. 


Then I grabbed a couple of those 8" zippers, one for each bag. I sewed one side of the zipper to the 2" piece, another to the body. Then I folded the whole thing inside out (with the zipper open) and sewed along the sides and top. A little ironing around all sides after turning it right side out, and I had a use-able wet bag. These will also go to the NICU for the premie baby gift bags.

Last but not least, I just sold one of my paintings. I had just finished painting the sides and it's waiting for a varnish and a backing before it's ready to go. My paintings are oils done with a palette knife. This one was a tasteful nude. You can just see a bit of it in the photo below.


Finally, I wanted to turn you all on to Sweet Potato 3. The last few years she has been hosting a Cancer Challenge every October.
Different designers offer new crochet patterns each day of the week of October, and a different project on weekends. The deal is, you get a new pattern, but you agree to give at least one of the items you make with that pattern to a Cancer Clinic. You can make all 30 or 5 if you want. Every little bit helps!

Last year I made quite a few hats to donate. Our cancer clinic is in our hospital, so I brought them there. Sweet Potato 3 also has free printables you can attach to your finished product that states size, etc.

Well, that's it Ladies and Gentlemen! I hope you have a great Thanksgiving! 

Gobble Till You Wobble! 

Carmen :)


Apr 15, 2018

Prayer Pocket with Measurements

Hello there,

I have a little treat for you today. 

My sister in law, Janell, loves to work in her scrapbook room making cards and playing with papers and ink. Watching over her are a bunch of monkeys because Janell loves monkeys. There's even a nasty rumour out there that she sleeps with one, but you didn't hear it from me --- Shhhhhhhhh. 
Ok kidding, seriously though my sister in law is one of the sweetest ladies you'll ever meet. My brother is a lucky guy!! 

We chat back and forth all the time and share our crafts and ideas, and recently she showed me something that she made for a couple of ladies. I had never seen one before and so I asked her if I could share it here with you. 

Without further adieu: This is a Prayer Pocket.


What is it's purpose? To write down who or what you are praying for.  To encourage you, to help you keep track.

I really just want to look at it for a while!

Note the stitching and the embellishments. It is just so cute! 

There are several pockets in there. Here they are dislodged from the pocket- 


Love the turned over corner and the little ribbon pulls on some of the tags. I especially love the dragonfly embelly....I have to ask her where that came from. Super cute!!

Below she shows us the back of the tags. Plenty of space to write and make lists. Perfect!


Isn't it lovely? I think this is a great 'just because' gift idea for a friend, someone that goes to church and someone who loves to pray. 

When Janell sent this to me I asked her if she had any measurements for these. She sent me some photos with measurements included. It will sure make it easy for you us to duplicate this beautiful prayer pocket. 

Measurements for Prayer Pocket: 

Measurements for the Two Part Pocket.
Again, LOVE the stitching

Want to know where to get Scripture Stamps? I'l link below.

I just love the edge punch on the bottom of this tag!

The dragonfly!!! Ka-ute!!

Sweet little corner punch

Love the ribbon on here.

I want that 'Joy" stamp!! 

Here's what she attached on the back of the little boy and the dragonfly tags. They are 2.25 X 2.25

  
Adorable, right?

Love it!

Here's where I've bought my Scripture stamps from. I have a couple of sets and I know Janell has at least one set of them. Check out Our Daily Bread Designs.

Do you want to see what else Janell and her monkeys are up to? Check out her Etsy Shop 
                                                     CreateBcuzURpricless 

I looked around to see if I could find anymore prayer pockets. There was only one I could find, which is where I believe Janell got her inspiration from. There is no link to a blog, unfortunately, but it was on Pinterest, so I will share the photo for ideas. This one was shared by Jeannie Phillips.


Thanks for stopping in -  

Oh, and someone wanted to say good-bye


Blessings,
Carmen

Apr 12, 2014

Bunny and Chick Tags, freebies

Hello!

I am preparing a package to ship to my grandkids and getting some other goodies ready. I like to add a personal touch when I give things, whether it be something I've made or in this case the tags I am adding.

Since I'd already made the peeps freebie a few days ago, I thought I would use those! 

Here's a photo of one that I added to a gift. These have to be cut by hand, but they're pretty cute attached to a gift. They're double-sided so you can write the name or a greeting inside.


This gift was for my daughter in law and the large chocolate bar is for my son. It's something small, but lets them know we are thinking of them. It's always nice to get a little gift now and then!

Since this is an SVG file, you can adjust it and it'll hold it's shape. So you can make it bigger or smaller. 


Since I am not quite done packaging everything yet, this is all I have to show you. I'm always running behind it seems!


Have a good weekend!
Blessings,
Carmen


Apr 20, 2010

Stamped Hang Tags

Hello! 

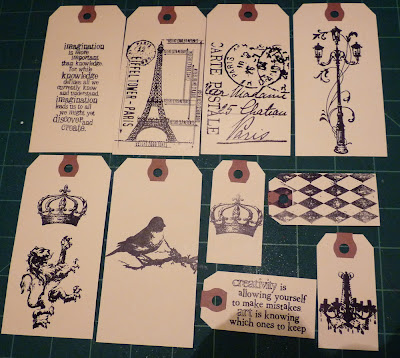
I've been busy working on an Art Journal. It's almost finished, but in the meantime I made some tags for my etsy shop. There's so many stamps I'd love to have and I'm sure you all feel the same...but who can afford them all? So I thought it would be fun to stamp some images on various tags and offer them for sale. Since they're stamped with Staz-on they won't run and can be inked or glimmer misted, etc. That way people can customize their own and enjoy some stamps they may not have.  Here's a few photos of some of them...the rest are in my shop.

 
 Oops...this one has a shadow on it...oh well....


Love the birdcage!


Have a good day and thanks for stopping by!