Whether I’m sewing, crocheting, card making, painting, or doodling, I’m always making something here in Kamloops, B.C. Don’t forget to check out my free digitals and vintage graphics while you’re here. Enjoy your visit!
Showing posts with label altered items. Show all posts

Jul 1, 2023

Mailbox Art

Happy Canada Day!

There’s many festivities happening, but we’ve had three sets of visitors today and decided to stay home. It’s too crowded and people-ly out there. 😃

So anyway-

I’ve been watching my plain white mailbox getting sadder and sadder over the last year or two and I keep telling myself I should really do something with it. So I did. 


Hmm, blue or colored? 


Here it is in its white, rusty, boring glory. It’s served us well, but not long enough - so I pulled out a few things.


First I cleaned off the rust the best I could, then covered it with clear nail polish.


Once that was dry, I painted the bottom of the lid with white acrylic paint. 


After measuring and cutting out the fabric, out came the trusty old mod podge. I recommend outdoor mod podge for this, but I used what I had and sealed it well. 

And here she is hanging outside where you can see the color better.


I bet the mailman is going be so excited! 😂

Thanks for the visit! Have a great week,
C~


Jul 31, 2020

Feature Post: Gelli Feathers

Hello,

How is your 2020 summer going? Here in the 'Loops it is really heating up with temperatures of 40C (104F), which is about normal for this time of year. I am enjoying our first summer with a central air system. Good Lord, what a treat that is. Hoo boy -- heaven!

I've been looking around and found a post by Birgit Koopsen, who is a Gelli print artist. She decided to do Gelli Feathers and I fell in love with them. My post today is a link to her video of how to gelli print feathers. 

You know, I don't have a gelli plate but am seriously considering getting one. I love these feathers and think they'd be great on cards amongst other things. So many craft ideas, so little time!


Enjoy the video and thanks to Birgit for sharing this fantastic tutorial. Birgit has a blog as well named 
Birgit Koopsen. Just click on her name to see it.

Thanks for stopping by on this hot summery day,

Blessings, 
Carmen

Feb 1, 2016

Upcycling Jeans into Craft Aprons

Good morning! 

Happy February 1st people! Say whaaat? I know, I can't believe it either! I'm looking forward to spring but love these cooler months because I stay inside and craft!

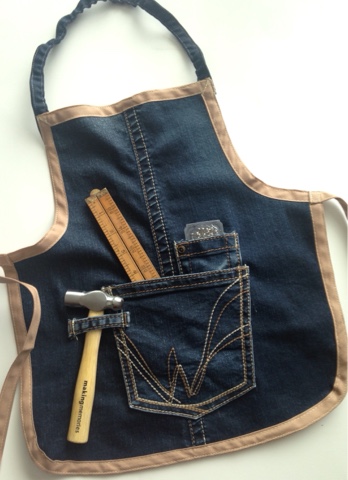
I've had about four pairs of old jeans hanging around for months wondering what to do with them. Then I found a post on Pinterest from Happy Hooligans called "denim pant leg craft aprons" and thought, "yes!" 

Yup, that's all I thought. 

There's a tutorial there if you want to check it out.

So here's mine. 


This first one is for my little 2 yr old grandson. Adorable hey? All I had to buy was double fold bias tape. It has the look of leather and denim with the added double stitching. The little inner pocket and a belt loop made for cute little functional holders,  and because this denim has spandex in it, it was soft enough for a comfy stretchy neck band.


This one is much like the original post. Why change up something that looks great? So cute for my little granddaughter. You can't tell from the photo unless you look closely, but the heart is made from a glittery red fleece.

I used the free apron template from Tiny Chef Toddler Apron from Craftsy for these, although you could just make up your own. The pattern comes with cute little oven mitts, like the ones I showed at the bottom of this POST.


Well, hope your February is fabulous!!

Have a great day,
Carmen

Jan 17, 2016

Hey Baby, It's Time For a Shower!

Hey there!

What a fun day I've had today! A bunch of us planned a baby shower for my daughter in law and baby Addison. I'm grateful my other DIL has the space for a party because our house isn't large enough. I made the cupcakes and a Diaper Cake! We also had a bunch of other food - vegies and dip, fruit and cheese, chips and salsa, popcorn, etc.

Instead of doing a traditional baby shower, we opted for an Open House with both guys and girls invited. There was a hockey game on, so there were people upstairs and downstairs. We decided not to have any Baby Shower games or contests (I know for some people that's a lot of fun but our time was limited). Instead, it was just a good time to visit, enjoy the baby and watch Mandy open presents. Laid back and fun! 

For the cupcakes I used recipes from Sally's Baking Addiction that I saved on my "Let's Eat" Pinterest Board. The first batch were Raspberry Lemon Cupcakes, and the second were "Death By Chocolate Cupcakes. Now these were not quick to make, they were a bit of work, but both types of cupcakes were so flavorful.  Really, really tasty. I'm glad I ditched the boxed cupcakes and spent the extra time making these.

I made them ahead of time and froze them; then put frosting on them this morning after thawing them overnight. It was so worth it! YUM-MY!

The BEST Raspberry Lemon Cupcakes: My Favorite Chocolate Cupcakes with Dark Chocolate Frosting - chocolate lovers only! Recipe at sallysbakingaddiction.com

I wanted to do something a bit different for a diaper cake. I saw this one first....A Carousel Diaper Cake.   It's a youtube video, and I fell in love with it, but then I realized I just didn't have the time. This is an adorable diaper cake, but sooo much work. I thought I'd share it here anyway, because maybe you want to make one some day?  It actually moves!


I did manage to make a Princess Palace Diaper Cake for this party though. A little less work but still adorable. There's tons of these diaper cakes on Google with instructions. Here's some pictures of mine. 
The sign Julie made

The diaper cake before we added little gifts to it. Love the drawbridge.


Left side, Baby Einstein CD's, Bibs, etc.

Right side

Front - cute little finger puppets.

Top Tower

Our little princess! 

She was so well behaved at the party. She slept for most of it. She got some cute little outfits and other beautiful gifts. Definitely spoiled! 

This was my 3rd or 4th diaper cake. Have you ever made a diaper cake? If so, what type? What did you put in it? 

Have a good week everyone! 

Blessings, 
Carmen

May 5, 2015

Snappy Bags and Craftblooms!

Hello!

I'm taking a little break from sewing at the moment, but I have some Bags that are finished now, and some Snappy Bags to show you.

My youngest son's girlfriend 'Katie' has been coming to do some sewing with me. We made that Book Bag that I showed you a few posts back- pattern by Renske. Remember? The nice and sturdy one made of canvas!

Then the other day she came and we made Snappy Bags together. This time she made all of it herself (except one line of stitching) since I kind of took over last time.

She loved her Snappy Bag, and I learned to sew with a metal measuring tape! 

Aaaand, here they are!

The fun thing about these is that the top just snaps back together after it's been opened and filled. and it holds all your little lipsticks, kleenex, candies, or whatever. Snap!


As well, I promised you I'd show you the last few bags I made, so here they are:

Grey Bag with colorful lining and pockets (SOLD)

Music Notes with newsprint lining and colorful zippered pockets

Sail Print with Blue lining and colored pockets

Red and Black with quilted bottoms, colorful lining and pockets

Zebra print with coffee bean type lining and colored pockets (SOLD)

Whymsical Bag, newsprint lining and colored pockets (SOLD)

I have one of these posted in my Craftblooms Etsy Shop and will be posting 2 others. The rest are sold. :) I decided to ask $40 CAD, which is about $34 US...probably the cheapest you'll find these for online. Then there's the actual cost of packaging and shipping. Still a good deal! 

I'm going to be doing some doodling again soon. I love the Bible Journalling I'm seeing all over Pinterest. I do mark up my Bible a lot, but I don't want to do doodling on my pages. Maybe if I get a Journalling Bible. In the meantime I hope to make some canvases up soon. 

Anyway, that's all for today!  Thanks for stopping by and see you again soon! 

Blessings!
Carmen

Apr 1, 2015

Trendy Book Tote by Renske

Hi there,

I know it hasn't been long, but I'm here to share my latest project with you. My youngest son has a girlfriend he's been dating for over a year now. She's the sweetest little thing you ever met and I think she'll be around a long, long time. :) 

A little while ago she asked me if I would teach her how to sew. I thought that would be fun, so we set a couple of dates to do that and I suggested she look online for a free pattern. Well, she found the best pattern ever. She was looking for a sturdy book bag as she's attending University. 

We downloaded the pattern and I drew it up (it was a pattern with measurements that you had to make up yourself). The nice thing about this pattern is that it's made of canvas. I had a bunch in my stash that we used and she chose some black fabric for the bottom of the bag from my stash as well. The canvas is perfect for this project as it's strong and sturdy. 

We followed the pattern pretty much to the tee, except for a few changes. This bag is lined inside as well. 

She found the original pattern on Design Sponge. It's a DIY project called Renske's Minimalist Tote Bag, with full instructions included. If you like it, go and check it out!

I immediately fell in love with this pattern because of the way the bag closes. How innovative is that?! It's a great closure and it adds a fun and trendy uniqueness to the tote. I thought it was genius on Renske's part!
Some of the changes we made: 

We made the handles out of canvas. Pretty much winged it, actually. Katie decided she wanted shorter handles so that the tote sat right at her side. 

The handles in the pattern are attached with rivets, but we used heavy duty snaps. Since the handles were a bit shorter, this worked well just in case she had a larger book to put inside it.


We changed the height of the bottom portion of the bag so that it would be more noticeable. Because it's a black fabric, this gave the illusion that the bag is skinnier than it truly is, which we didn't think about at the time, but which doesn't take away from it at all. It's kind of cute.

We also put a row of stitching around the top of the bag to hold the lining in place better. It just finishes everything off better in my opinion. 


Well, thanks so much for a great pattern, Renske. I absolutely love it and I plan to make more. I already have something in mind for the next one. :) 

Next: 

I'm cutting back on a lot of my craft supplies, but with all the orders I have for my cosmetic and sewing bags, I have had to buy some current fabrics that will work for those projects. Don't worry, I will use all of this up. No more hoarding. Promise.


Ahhhhh....I LOVE looking at these colors and designs! I also got some darker colors...feels so good!


Here's a few cut up and ready to go...2 of them are almost finished already.

              
I've been busy. 


Well, I think I'll end the post here. In the next while I'll be sewing up about 8 of the cosmetic /sewing /crocheting /jewelry bags and will post them here when they're done. 

See you then!
Blessings,
Carmen


Jul 28, 2014

Cute Dress Patterns...

Hi ladies!

Well the heat is on again in my part of the globe! So with all the free fabric I just received, it was a good opportunity to stay indoors and make some dresses. I'm sure there will be more sewing posts in my future. 

This one is a free pattern I found at TJ's Fabrics for a curtain dress. It's easy to make and an easy pattern to follow. I love hers in the bold colors, but we opted for a toned down version with a smaller bow.

Here is our take on it:


I managed to take a better photo of it which also shows that the bow is removable.


Then I bought a pattern from Etsy for The Ella Dress by Petite Kids Boutique. I absolutely love the fabric she used on hers as well...I wish I knew where she bought it because I'd love to make one just like it in the near future.

Here's the fabric I used with this pattern. I do like it. The pink fabric is actually a small polka dot: 


Although the skill level is a bit more than basic, it was an extremely easy pattern to follow, an enjoyable dress to make, and it turned out awesome. I absolutely love this one and will be making more.  It's hard to tell but there's a bow in the back of it which covers some ruching. I think the bodice is adorable. The pattern covers sizes 12 mo. to 8 years. I'll be getting lots of use out of this pattern.

I don't know if I've ever mentioned it, but I used to sew professionally. It was for a small company called Rainbowear here in Kamloops. They made adorable clothes with a bit of an english flair. I love making clothes for kids and it's fun having little girls to sew for. Finally! : )

My daughter in law has picked out several fabrics for some things she'd like me to make, so I will probably be showing you as I go along.

I am still doing a lot of studying as well, and life in general is busy (babysitting grandkids, cooking meals for family, canning, etc.), so the cards and digitals are on hold for a little while. Please be patient with me!

Hope you're all having a wonderful week so far!

Thanks for stopping by! Blessings,

Carmen

May 2, 2014

Birthday Countdown and Northern Lights

Good Morning!

It's a nice sunny day here and although I'd love to go out, I have been so sick. :-(   I just took some Tylenol Day for cold and flu about 20 minutes ago...so I am not responsible for what follows... (jks). I do feel a touch better today...

Lately I've been playing around with the Northern Lights Technique.

Dec 15, 2013

A Storybook Brought to Life

I love to look around the internet for good ideas and once in a while I run into something really, really magical! That was the case when I found this item on Salttree, by Amber. It is just amazing!!

I fell head over heels in love with it and decided right there and then that I had to make one.

My process was a little different than Amber's was because I hate working with Snow Tex and opted not to use it. I really, really like her bench but couldn't find one quite that awesome. I did find some fun things to use.

The trees in mine look the same as Amber's in real life. The lighting is just horrible in my place and extra lighting seems to make the photos appear washed out. I guess I should start taking my photos outside. Shiver, shiver.....


I didn't cut out my book quite as deep but did run the inside page through a printer, as Amber did. 

I really enjoyed making this Magical Winter Scene and hope to make more by next Christmas as gifts.

If you'd like to know how I made mine I'd be happy to answer any questions you have. However, there is a tutorial on Amber's Blog and I suggest you check it out at SALTTREE.

In the meantime,
Have a very Merry Christmas! 

Blessings
Carmen


Oct 22, 2013

A Minion, A Cowl and Some Advice, Please!

Hey there!

It's been really foggy here lately. It's unusual and I'm loving that misty, mysterious look. Well, as long as I don't have to drive in it too much.

I've been rather occupied lately as I'm in the process of re-setting up an Etsy shop for some of my digital stamps and also thinking of doing one for my crocheting. My family and friends have been telling me I should be selling my crocheted items, so I'm giving it a go.

The two don't seem to go together all that well and I thought maybe I should do separate shops? I know some of you must have Etsy shops and could give some advice. Any input on that would truly be appreciated!!

Anyhoo....

I can't seem to work on one thing at a time. I have 3 or 4 things going at once. Does anyone else do that?

Here's two items I have completed. I really want to make more minion hats. They're so cute! This pattern doesn't allow you to sell them, but I have another that does.
This was a free pattern from Janet Carillo

This is the Bailey Bear Cowl pattern created by The Velvet Acorn.
I took about 15 pictures of the cowl, and this was the best of the bunch. Pretty sad, but you get the idea. 
I folded the bottom up a bit because it just looked funny without a model wearing it. 

 Check out the photo on The Velvet Acorn and you'll get a better idea. 
She also has some amazing patterns, if you're a crocheter! 

I also made an 18" doll. She's cute hey?

The pattern didn't come with a skirt, so I made one for her.
That's it for the crocheting for now. :)

It's time to make up another free digi for you soon too. 

Remember, I'd love some input on the Etsy Shop/Shops!

Thanks for visiting! 
Have a good week,
Carmen

Oct 10, 2013

Mini Muffin Tin Advent Calendars. Free Digi

Hello!

September was a whirlwind of activities that doesn't seem to show signs of slowing down for October! I guess you could say I've been having fun! :))

I am going to show you my completed Advent Calendars today and some of the 'twinchies' up close and personal. ;-)


I've been busy! If you look closely, a couple of the twinchies have my digi stamps on them. See them?

Some of the images I cut out of 6X6 albums I bought. I love the hot chocolate one. Some were just embellishments I had in my stash that I may have put some glitter glue on or just left as is.

Check out the Grinch , the mouse and the fireplace. I made the skates out of paper clips and interfacing.


These Advent Calendars were made using mini muffin tins. Each twinchie has 4 magnets in the corners which hold it to the tin and keep the candy or gifts inside until the kids open them. They are all numbered up to the 24th.

In other news***

Here's some cards from the Squigglefly designers that they've made up using my images. 

Made by Kathy from "Entering Kathyville," Graham's awesome Tall Ship image
It is available for purchase at Squigglefly.
Made by Debbie from "Debbie's Adventures," my Stuffed Mitten image.


Great work ladies! You do our images proud!! :)

Well, that's all for today. I hope you have a nice weekend. It's Thanksgiving weekend here in Canada so it's a day longer...enjoy!

Blessings,
Carmen