I want to thank you all for taking time to visit me in my little corner of the world!

Dec 24, 2009
Dec 23, 2009
Creativity is Key...More Tags
Hello Everyone,
I recently shared the Tim Holtz 12 tags of Christmas with you...
I've also shown you my take on two of those tags.
Now I would like to introduce you to a fellow blogger from Holland, Paulien van den Bosch. She has a blog on which she shows us her take on the 12 tags of Christmas. I love the way she used supplies she had on hand, and got really beautiful results!! The specific posts on the tags are here:
First Part
Second Part
Thank you for visiting, and Merry Christmas!

I recently shared the Tim Holtz 12 tags of Christmas with you...
I've also shown you my take on two of those tags.
Now I would like to introduce you to a fellow blogger from Holland, Paulien van den Bosch. She has a blog on which she shows us her take on the 12 tags of Christmas. I love the way she used supplies she had on hand, and got really beautiful results!! The specific posts on the tags are here:
First Part
Second Part
Last Part
I just want to encourage you that creativity really is the key! You're only limited by your imagination!! Now go into your scrapbook room/desk/space....and CREATE your hearts out!
I just want to encourage you that creativity really is the key! You're only limited by your imagination!! Now go into your scrapbook room/desk/space....and CREATE your hearts out!
Thank you for visiting, and Merry Christmas!

Dec 19, 2009
Trimming the Soap for Christmas
Hello Everyone,
The soap has cured, so I thought I'd share my final step with you. Once the soap has cured, there is sometimes a residue on it from the lye. This needs to be trimmed off...like so:
 You can see the white residue on it in the picture above. It's not that it's necessarily harmful, and you can just wash it off, but it doesn't look that nice so I remove it.
 Then I make up some labels. A few years ago I decided to call my product "Funky Moon Soaps." Don't ask me why...it just appealed to me at the time.
 So here it is with the labels on. This year I made "Christmas Brick" (Beer Soap), "Tropical Rain" (really nice mild scent), and "Mmmm...Neroli!" I love Neroli! I sell my soap locally to some friends and family. I'd rather use them myself, but people do ask for them.

You're probably wondering what I did with the leftover soap trimmings. No, I don't throw them out. (After all that work? What'r you thinking? Gasp!) I wash the white stuff off and roll them into soap balls, put them in a dish and display them. They make the washroom smell so nice, and they can be used for handwashing.

So there you have it. If you want the recipes for the basic soap, email me and I'll be happy to send them to you.
(Disclaimer: Please be smart about it and learn how to make soap properly first! There are lots of good sites online...in fact, I'll email those along with the recipes. Cold process soap making is a chemical process that can be harmful if done incorrectly, and therefore I am not responsible for what you do with this information, should you request it.)
Well, have a Merry Christmas Everyone! Thanks for visiting my blog. I appreciate your interest!
The soap has cured, so I thought I'd share my final step with you. Once the soap has cured, there is sometimes a residue on it from the lye. This needs to be trimmed off...like so:
 You can see the white residue on it in the picture above. It's not that it's necessarily harmful, and you can just wash it off, but it doesn't look that nice so I remove it.
 Then I make up some labels. A few years ago I decided to call my product "Funky Moon Soaps." Don't ask me why...it just appealed to me at the time.
 So here it is with the labels on. This year I made "Christmas Brick" (Beer Soap), "Tropical Rain" (really nice mild scent), and "Mmmm...Neroli!" I love Neroli! I sell my soap locally to some friends and family. I'd rather use them myself, but people do ask for them.
You're probably wondering what I did with the leftover soap trimmings. No, I don't throw them out. (After all that work? What'r you thinking? Gasp!) I wash the white stuff off and roll them into soap balls, put them in a dish and display them. They make the washroom smell so nice, and they can be used for handwashing.

So there you have it. If you want the recipes for the basic soap, email me and I'll be happy to send them to you.
(Disclaimer: Please be smart about it and learn how to make soap properly first! There are lots of good sites online...in fact, I'll email those along with the recipes. Cold process soap making is a chemical process that can be harmful if done incorrectly, and therefore I am not responsible for what you do with this information, should you request it.)
Well, have a Merry Christmas Everyone! Thanks for visiting my blog. I appreciate your interest!
Dec 17, 2009
Tags for Christmas
Hello Everyone!
If you haven't seen Tim Holtz's 12 Tags of Christmas 2009, then please take a look at the post below!
Here are a couple of attempts of some tags that I made...and just in time for Christmas! Bear in mind that I don't own all of the products required to make the tags to be just like Tim's, but I did my best with what I had on hand!
The first one is based on tag #5. Tim uses the larger tag #8, which measures 6 1/4 X 3 1/8. I couldn't find any in town without having to buy 1000 at a time (and they were out of them anyway), so I made mine out of a file folder, and used reinforcements to add strength to the hole for the ribbon.
 I used gold paint for the flourishes, and a "writing" stamp for the background (with Staz on). The ink colors are vintage photo distress ink, and Close To My Heart cranberry ink, which I found worked quite well. Please double click on the photo to get a closer look. You can use your back arrow to bring you back to this page.
For the Fragment charm photos, I used a rub on, a photo, and a stamp with some background ink. I attached them with Glossy Accents glue, then cut the excess off and sanded the edges. The ornament tops were made using foil tape. I used some floral wire to attach them to the page (they're taped down on the back of the tag).

I didn't have any stickers for the top and bottom, so I used a Close to my heart stamp (Lovely Lace) stamped with versamark ink and antique gold embossing powder, then cut them out and glued them on with glue dots.
The next one is similar to Tim's tag #1. Now I have to admit...it does not give anywhere near the intense joy of Tim's tag...but I was using what I had on hand. It turned out okay...but next time I will definitely use Tim's crackle paint for the ice effect on the background. I am not quite as impressed with the one I had. Live and learn.
 For the background, I didn't have any spritzers, so I used wax paper and stamped with broken china distress ink, and close to my heart blue ink (moonstruck)...then I sprayed some pearl glimmer mist on it in place of water. I took the tag and rubbed it around, dabbed it dry and let it dry the rest of the way on its own. I stamped the snowflakes with Jet Black Staz on ink. Once it was all dry, I put the crackle paint on and let it dry while cutting out the snowman (Inkadinkado Filigree Snowman) which I had stamped on a separate piece of white cardstock with the Staz On ink and spritzed with pearl glimmer mist. The chipboard swirl is Maya Road...I painted it white with acrylic paint and added some stickles.
 The top of the tag also has stickles on it made to look like icicles. There is also stickles on the scarf and hat. I covered the snowman with some Glossy Accents to give it a bit of strength so that it would not rip.
So, there you have it. I don't think I'll do anymore tags for a little while, although I'll be looking at them again next year. Christmas is just around the corner, and I'm enjoying the smell of baking shortbread while I'm typing this. There's lots of company coming this year, and I have lots of other things to do, and hope to get some more butterflies made. I'll get that etsy shop going yet!
Thank you for visiting! I love to see your comments, and if you like the blog, please follow! Merry Christmas everyone!!
Hugs,
Dec 16, 2009
Tim Holtz 12 Tags of Christmas 2009
For those of you who haven't seen them yet, here are Tim Holtz's 12 Tags of Christmas 2009!!
If you would like to know how to make one of these tags, go to Tim Holtz's Blog where the instructions for each tag are included. Each one of these creations started with a blank manila tag...so all the backgrounds are also hand made with ink!
I have to admit, I was completely impressed when I saw the amount of work and the creativity that went into each tag! So without further talk...here they are!!

Day 2

Day 3

Day 4

Day 5

Day 6

Day 7


Day 9

Day 10

Day 11

Day 12

Tim has graciously allowed us to post photos of his Christmas tags on our blogs. I hope to try to make one or two of these soon. If I do, I'll be sure and post them here. There's more than a few that I just love!
Some of the techniques he showed us were just amazing. It's mind boggling what one can do with some paper, ink, metal, and the right tools. I can't wait to try some of these out!
If you double click on the pictures, it'll show you a larger version of the photo. Just click on the back arrow to return to this page.
Thanks for visiting!
If you would like to know how to make one of these tags, go to Tim Holtz's Blog where the instructions for each tag are included. Each one of these creations started with a blank manila tag...so all the backgrounds are also hand made with ink!
I have to admit, I was completely impressed when I saw the amount of work and the creativity that went into each tag! So without further talk...here they are!!
Day 1

Day 2

Day 3

Day 4

Day 5

Day 6

Day 7

Day 8

Day 9

Day 10

Day 11

Day 12

Tim has graciously allowed us to post photos of his Christmas tags on our blogs. I hope to try to make one or two of these soon. If I do, I'll be sure and post them here. There's more than a few that I just love!
Some of the techniques he showed us were just amazing. It's mind boggling what one can do with some paper, ink, metal, and the right tools. I can't wait to try some of these out!
If you double click on the pictures, it'll show you a larger version of the photo. Just click on the back arrow to return to this page.
Thanks for visiting!
Dec 12, 2009
Beautiful Gift Idea
Hello Everyone,
I'd like you to meet one of my best buddies, Adriana. Today I am featuring Adie's scarf.
Many of you are looking for gift ideas for Christmas that are affordable, but still adorable. Well, this is it. Look no further!
You know all the bits and pieces of yarn you have sitting somewhere in a container, neatly wrapped to keep it clean, just in case you find a use for it someday? The day has come to pull it out, because here is something beautiful you can make with it.
I had 80 hold it out so that you could see how it was put together. Basically here are the steps:

1) Measure out different types of yarn into approximately 6 ft lengths.
2) Measure out some more of the same types of yarn into approximately 2 - 2 1/2 ft. lengths.
3) Find the middle of the 6 ft lengths, and tie the 2-2 1/2 ft lenth in the center of it as shown above.
4) Now take 4 pieces of yarn and tie one on each end about 2 ft in, and again about 1 ft in from the ends.
5) Put it on. Done!
Now there are about 3 ways to wear this. We know of two. One way is shown in the photo below, leaving the ends just hanging on the sides. The other way is to fold the scarf in half and pull the ends through as shown below.

 I thought I'd show you a close up of the fibres she used in this scarf. The sky is the limit though, and I'm sure you could come up with some beautiful combinations. The eyelash fibre is especially beautiful in these, as are the fibres that look like little ladders...you can see it lying on top in the photo below. Anyway...have fun with these!

In the next while, I'll be leaving you with a tip that will save you all kinds of money in your scrapbooking endeavors. Stay tuned!
I really appreciate your interest and hope you'll follow and leave a comment! I love your comments, they make my day! Thanks for visiting and come back soon! =D
I'd like you to meet one of my best buddies, Adriana. Today I am featuring Adie's scarf.
Many of you are looking for gift ideas for Christmas that are affordable, but still adorable. Well, this is it. Look no further!
You know all the bits and pieces of yarn you have sitting somewhere in a container, neatly wrapped to keep it clean, just in case you find a use for it someday? The day has come to pull it out, because here is something beautiful you can make with it.
I had 80 hold it out so that you could see how it was put together. Basically here are the steps:

1) Measure out different types of yarn into approximately 6 ft lengths.
2) Measure out some more of the same types of yarn into approximately 2 - 2 1/2 ft. lengths.
3) Find the middle of the 6 ft lengths, and tie the 2-2 1/2 ft lenth in the center of it as shown above.
4) Now take 4 pieces of yarn and tie one on each end about 2 ft in, and again about 1 ft in from the ends.
5) Put it on. Done!
Now there are about 3 ways to wear this. We know of two. One way is shown in the photo below, leaving the ends just hanging on the sides. The other way is to fold the scarf in half and pull the ends through as shown below.

 I thought I'd show you a close up of the fibres she used in this scarf. The sky is the limit though, and I'm sure you could come up with some beautiful combinations. The eyelash fibre is especially beautiful in these, as are the fibres that look like little ladders...you can see it lying on top in the photo below. Anyway...have fun with these!
In the next while, I'll be leaving you with a tip that will save you all kinds of money in your scrapbooking endeavors. Stay tuned!
I really appreciate your interest and hope you'll follow and leave a comment! I love your comments, they make my day! Thanks for visiting and come back soon! =D
Dec 6, 2009
Flowers, Butterflies and Dragonflies
Hello Everyone,
I know I'm giving you all the impression that I have nothing better to do than play...but keep in mind that I went shopping, did some laundry, made butter tarts, fudge puddles and dinner in between time. I even remembered to eat some lunch (a cucumber...I love cucumber). Anyhow, here's what I did in my spare time...


...I just love these dragonflies and this sparkly butterfly...I was surprised how well they turned out. I like the dragonflies better than the butterflies! Sorry about the picture quality...I really should take more time to do a good job with the photos.


Here is a photo of one of the butterflies I made on a layout.
The actual layout can be found here and here, if you're interested.

I'm just having a little too much fun...in between time...
Thank you for stopping by and see you next time!
I know I'm giving you all the impression that I have nothing better to do than play...but keep in mind that I went shopping, did some laundry, made butter tarts, fudge puddles and dinner in between time. I even remembered to eat some lunch (a cucumber...I love cucumber). Anyhow, here's what I did in my spare time...
I made these sparkle and shine...


Then I had fun making some acetate butterflies....


...I just love these dragonflies and this sparkly butterfly...I was surprised how well they turned out. I like the dragonflies better than the butterflies! Sorry about the picture quality...I really should take more time to do a good job with the photos.


Here is a photo of one of the butterflies I made on a layout.
The actual layout can be found here and here, if you're interested.

I'm just having a little too much fun...in between time...
Thank you for stopping by and see you next time!
Dec 3, 2009
Lighted Glass Blocks
Hello Everyone!
Well, here's my latest project. I did a bunch of these up last year, and have orders for more this year. They are so easy to make if you have the right tools. After Christmas last year I bought up scads of ribbon for these...and I'll probably use some for wrapping gifts!
Like my fancy background? I'm not the queen of decor...I must admit...but you get the idea.

I really love this one with the light blue ribbon. The photo doesn't really do it justice. This one has the added effect of frosting on the glass.

I just did this little red one up for a friend today. This one has the clear glass. It's such a cute little thing. She is putting it on a table in her foyer at the entrance of her home. It's going to look so adorable there!!

Here's another picture of hers, and a regular size gold one I still had from last year. You can't see it here, but the dots on the ribbon reflect different colors. So beautiful!! This one is also frosted glass.

Here's the blue one all lit up

Aaaannnddd.....the gold one lit up.
These are so much fun to make! Here is a list of supplies for those of you who want to try it. The only thing you may need to get, is someone who has a diamond tip for a drill and is willing to bore a hole through the glass for you.
Supplies:
One glass block (approx. $5 at a hardware store)
Christmas tree lights, white or colored
Wired Ribbon
Glue Gun
Glue sticks, preferably clear
Diamond tipped drill to make small hole
Frosted glass spray (optional)
A bow maker is helpful (Michael's)
Floral wire
Christmas tree lights, white or colored
Wired Ribbon
Glue Gun
Glue sticks, preferably clear
Diamond tipped drill to make small hole
Frosted glass spray (optional)
A bow maker is helpful (Michael's)
Floral wire
That's it!! They make great Christmas gifts and they really do look nice in a home, or even along the driveway as lighting...that looks especially nice in the snow! Thanks for looking and come back soon!
Dec 1, 2009
Miss Abbey's Jewel
Hello Everyone!
Today is a special day! Why, you ask? Well, I'll tell you! Today is the day that I am featuring someone VERY special on this blog. She's a little 3 1/2 year old sweetheart named Abbey.

Now isn't she just the sweetest thing in her flouncy skirt and all? Don't say I didn't warn you!
Anyway, I have a little story about Miss Abbey. You see, we have an aquarium that contains one very large violet jewel that Miss Abbey just loves.
One day she asked my husband if she could hold it. So he took it out of the water, cleaned it all up, and let her hold it.
If that large beaming smile was worth money, we would've been rich right there!
Then, while batting those big blue peepers (yes, even at that age), she asked him if she could keep it. My poor husband (who adores children), with all the strength he could muster, told her we couldn't possibly give it to her...it belonged with the fish!
With that, Miss Abbey bravely returned the big violet jewel to him. She was SO brave and so polite about it!
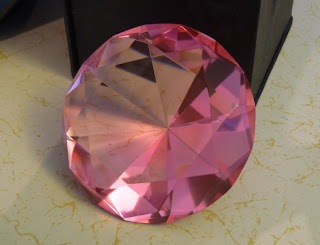
Sometime later we were in a fantastical magical place called "Michael's Arts and Crafts," when suddenly something pink and shiny caught our attention...we could hardly believe our eyes! ( :0 ) Lo and behold, right there in front of us was a shelf full of big, sparkly, colorful jewels ~ fresh from Magic Mountain!! We quickly grabbed the biggest, shiniest, most beautiful jewel we could find, and brought it home for Miss Abbey.
However, now we had a problem. We needed to find the perfect box to hold Miss Abbey's beautiful pink jewel...but this was the only one I could find:

I put it on the table, and every time I walked by it I would stop, look, and shake my head.
What to do?
Then suddenly, one day out of the blue some inspiration hit me! I don't know where from...and my head was a little sore, but right there in front of me the box was transformed into a blue glittery package ~ PERFECT for holding a big, shiny, beautiful jewel.
Here are some photos of the transformed box:


So there you go Miss Abbey Grace! Come and get it at Uncle Chris's birthday on the 9th. It's waiting for you with lots of hugs and kisses!!
Thanks for visiting everyone! I hope you enjoyed our little story about Abbey's Jewel!
Today is a special day! Why, you ask? Well, I'll tell you! Today is the day that I am featuring someone VERY special on this blog. She's a little 3 1/2 year old sweetheart named Abbey.
Meet Miss Abbey Grace (warning...cuteness ahead!)

Now isn't she just the sweetest thing in her flouncy skirt and all? Don't say I didn't warn you!
Anyway, I have a little story about Miss Abbey. You see, we have an aquarium that contains one very large violet jewel that Miss Abbey just loves.
One day she asked my husband if she could hold it. So he took it out of the water, cleaned it all up, and let her hold it.
If that large beaming smile was worth money, we would've been rich right there!
Then, while batting those big blue peepers (yes, even at that age), she asked him if she could keep it. My poor husband (who adores children), with all the strength he could muster, told her we couldn't possibly give it to her...it belonged with the fish!
With that, Miss Abbey bravely returned the big violet jewel to him. She was SO brave and so polite about it!
Sometime later we were in a fantastical magical place called "Michael's Arts and Crafts," when suddenly something pink and shiny caught our attention...we could hardly believe our eyes! ( :0 ) Lo and behold, right there in front of us was a shelf full of big, sparkly, colorful jewels ~ fresh from Magic Mountain!! We quickly grabbed the biggest, shiniest, most beautiful jewel we could find, and brought it home for Miss Abbey.
However, now we had a problem. We needed to find the perfect box to hold Miss Abbey's beautiful pink jewel...but this was the only one I could find:
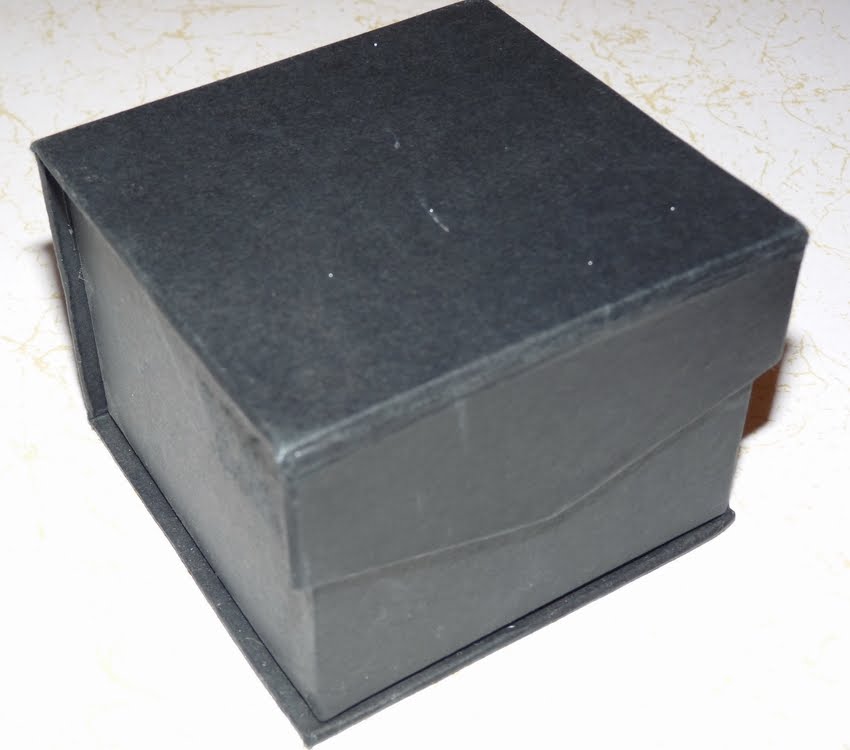
Oh dear! :(
I put it on the table, and every time I walked by it I would stop, look, and shake my head.

What to do?
Then suddenly, one day out of the blue some inspiration hit me! I don't know where from...and my head was a little sore, but right there in front of me the box was transformed into a blue glittery package ~ PERFECT for holding a big, shiny, beautiful jewel.
Here are some photos of the transformed box:


Even Tinkerbell flew on top of it, sprayed some fairy dust, and left a beautiful blue BUTTERFLY!!
So there you go Miss Abbey Grace! Come and get it at Uncle Chris's birthday on the 9th. It's waiting for you with lots of hugs and kisses!!
Thanks for visiting everyone! I hope you enjoyed our little story about Abbey's Jewel!
Subscribe to:
Posts (Atom)