Hello there!
A couple of years ago I folded my Christmas napkins into Elf Boots. They got rave reviews, so I thought I'd show you how to make your own for this Christmas.
The napkins I used were on the smallish side, but you can buy larger napkins if you like. Anyway, here's the Elf Boot:
They look adorable on a Christmas Table. I put a couple of small candy canes in the top that year.
Here's a photo tutorial on how to make one:
1) Open up your napkin and fold both sides into the middle.
2) Now fold one more time in half
3) You now have a rectangle. With the two folded sides facing you, fold one side down from the middle. Leave a teeny bit of a gap in the top center.
4) Go ahead and do the same thing with the left side
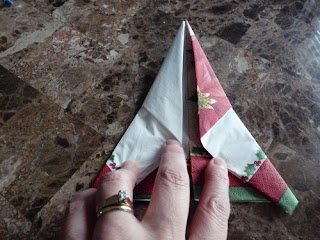
5) Now fold the right side down again from the middle, as shown below
6) Aaaand, do the left side (this is looking simple, huh?) In fact, it's almost looking like a paper airplane!
7) I'm just going to move it so it's facing sideways......
8) Okay, now fold the top side down to the bottom side...it'll be a little thick.
9) You now have something that looks like this. I know, you're impressed....
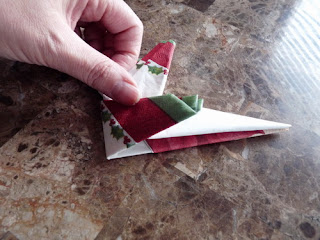
10) Almost done! Take the top layer and fold it up, lining it up with the little pocket as shown below:
11) Take the bottom layer and fold the little tip of it down, as shown below
12) This is where it gets a little bit more complicated...but it's really easy, I promise. You fold that bottom piece over to fit in the little pocket in the middle bottom. Check out the photos below:
13) Aaaaaand....you just tuck it in there snuggly!
You now have this:
14) Now we want to grab some floral wire, a jingle bell, and bend the tip of the "toe" of the elf boot with the wire and bell inserted in the folds (in the bottom of the boot toe). The wire will help keep the toe bent up.
As you can see, I bent the collar down and added some shiny holly and a berry inside the other side pocket. (I used what I could find quickly) You can also add things in the top, but you don't want too much weight or the Elf Boot paper napkin won't stand up!
You're done! Good for you!! =D
UPDATE 2011: Here's a photo I found of some I made before...they're a little ragtag, but I wanted to show you how they look with different napkins.
Depending on the napkin you use, you can get a really elegant looking Elf Boot!! You can use anything to fill the pocket or top that you want; feathers, place names, candy canes, styrofoam snowballs, etc. The sky is the limit.
I hope you enjoyed this little tutorial, and I hope it's easy to understand.
Thanks for visiting!
Carmen


How clever! I'm also loving the paper bag tutorial. Still loving my soaps.
ReplyDeleteOh this is SO dang CUTE!! Thanks for the amazing tutorial! I am for sure going to give this a go:-)
ReplyDeleteAny more Christmas folding for the table?
ReplyDeleteHi Anonymous...can't think of anything off hand, but check out YouTube, and search for Napkin folding...there's lots there!
ReplyDeleteThis is such a cute lttle decoration for the table. Can't wait to try them for our family party Saturday!! Thank you! LOVE IT!
ReplyDeleteHow clever! Thanks for sharing.
ReplyDeleteChristmas 2012 and I've just found this! About to give it a go....thanks for sharing this (and keeping it online!)
ReplyDeleteI just discovered this page of yours and will be doing them for our Christmas table. Thanks very much. All the way fromPerth, Western Australia!!! Merry Christmas everybody!!
ReplyDeleteNice
ReplyDelete