Whether I’m sewing, crocheting, card making, painting, or doodling, I’m always making something here in Kamloops, B.C. Don’t forget to check out my free digitals and vintage graphics while you’re here. Enjoy your visit!

Oct 28, 2011

Birthday Awning Card and Free Digi's!

Hi there! :)

You have all been leaving such incredibly sweet comments!! Thank you so much!!

Welcome to all my new followers as well!! I hope you will all enjoy visiting my little corner of the web. I sure love having everyone visit!! 

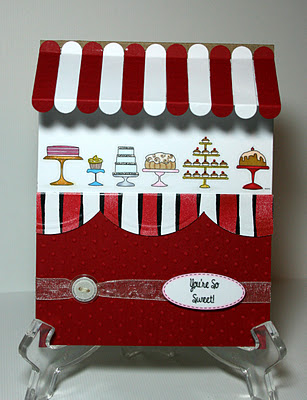
So today I'm going to show you an Awning Card. I made this card for my daughter in law Mandy, whose work I sometimes feature on this blog. She's a real sweetheart!! As a matter of fact, I just love all my DIL's...they're all just wonderful women who are just perfect for my boys. I really mean that!! I get along with them all.  I'm SO blessed!!

Anyway, It is Mandy's birthday this Sunday...and I'm hoping she doesn't look at the blog until after she gets the card. I know, I know...

Here's the card'
 I like to give credit where credit is due. This is not my original design, but got it from Stampin' with Di, who got it from someone named Elsie Camp from a swap at a convention. I cannot find a blog for her. Diana Gibb has a video tutorial on how to make the card HERE. Check it out if you're interested.

Here are the measurements for the card bits:

Basic Card: Score at 5.5" and cut at 4.25"
White cardstock for image: 4.25" X 3.5" (I sized the image itself on the cardstock at about 4")
Awning: Main backing cardstock: 4.25" X 1.25"
Awning: Stripes - Window Slot Punch, white (5) and designer cardstock (6)
Bottom Portion: Double sided designer cardstock 4.25"X 3.25" (scallop one edge and score at 0.5")

I glued the window slots onto the backing cardstock for the awning. I didn't butt them right up to each other but left a teensy bit of space. I also used the lines on my cutter to keep things straight.
I bent one side one way, and the opposite side I bent the other way. Like so:
I Cuttlebugged the bottom portion of the card with the Pinstripe Folder by Couture Creations.
I used some Baker's Twine on the card as well.
I used some stickles on the Digi, and pop dots for the sentiment.

The nice thing about this card is that you can make a shoe store, and ice cream shoppe, a flower shop, etc. In fact, check back because I'll make up some more Digi's that would work well with this card. 

Anyone have any other ideas that might work? No guarantees, but suggestions are welcome! :)

And here's the Digital Stamp I have for you today. You need fine markers for coloring these!
Here is the 'Birthday Sweets' sentiment page. I've put a bunch on one page; I figure you can probably use the extras another time anyway! I made them simple, because sometimes a simple sentiment looks best on a card.
Well, that's it for today. I hope you've enjoyed visiting! I've sure enjoyed having you!
UPDATE:
Here are my newer images that can be used with the Awning Card.

Gale, from Playing With Paper Again made up an Awning Card using some of my images. She did a wonderful job on the card....but then, she does a wonderful job on ALL her cards! Go check her out...you'll be glad you did!! Here's her card!
Here's a couple more cards using some of these images by Sandy! I'm sorry, I don't have a blog to link to, but these are too nice not to share!! Thanks Sandy!
Karen, from Serendipity Dragonfly made up a bunch of samples for her Club. Karen directs the ladies to my site to download the free digi's and then teaches them how to make up the cards. She also has some other samples of images you can use with these cards. They're just so versatile! Do click on the link above and check out her site for some fabulous cards!
CG, from CG-Says Something Loudly made up an Awning Card using the cake stand digi...and then she also added a sliding detail to the card. How clever!! Go check out the blog post at the link and have a look see!


Here's another done by Andaje from HotchPotch Ehhh?? Adorable, isn't it? She's also made something to place it in. Check out her blog! 

Blessings!
Carmen

Oct 25, 2011

Wonky Silhouette Digi

Hi there!

Well, I'm on my second week of full time Daycare and I'm doing okay!  

I don't know if I'll ever get used to getting up early though! In addition to my daughter in law going back to work for a while, my son has also started a brand new job, and once he goes on shift I may have to get up even earlier. Blech...hopefully not!

I love spending time with the grandkids though. They are SO much fun! We sing kids songs in dutch, and I hop them on my knees, sometimes together since Kai gets upset if I just do baby Lauryn. Oh my aching legs!! Lol...It's okay, they need the workout. :-)

While they were napping today I finished off a digi I've been working on for a while.

 It's a city street silhouette!

I started out making normal houses, but somehow they ended up skewed, and I liked it better. I'm really predictable, so any opportunity to do something a bit different makes me feel...well...

Unpredictable. Lol...

They're wonky, and I like wonky! Hope you do too!

CG from Cg-Says Something Loudly created this beautiful card with this Digi!
The front:
The inside:
 Awesome job, CG!

Have a wonderful rest of the week.

Carmen

Oct 22, 2011

Vase of Roses Digi Freebie

I hope you're all enjoying your weekend! The sun just started shining here...but it's been dark and dreary 'till now. It's funny how the sun can brighten anyone's mood! Love it!

I just got some homemade soap labelled and prepared for the Pregnancy Center in town, and I've stopped for a cup of earl grey tea - so thought I'd do up that post I promised you this morning! 

**So, this is my second post for today** Scroll down if you want to see my first post, or click on 'home' at the top of the page and scroll down if you're coming from another site.

This is another of Grahams images, but it's not masculine.I love this digi because the vase that the roses are in is a copy of one of my vases, and it broke a while back. It was wrought iron with glass. Beautiful!
Well, I have a few other things to check on, then I have to go do our company's bookkeeping for the last quarter. I forgot how precious time becomes when you work! Every moment seems to count...not that I'm complaining - I love it!

Remember, if you use my images let me know - I'll post them under the original image with a link back to your blog!

NOTE: You'll notice that my images now show up properly when you click on them and save them. If you're having the same problem it's a simple fix. Just go to Settings/Posts and Comments / or  Settings/Formatting, and click on NO under the lightbox option. 

Blessings!
Carmen

Birthday Card and a Request

Hello!

I got this post ready a while ago, but had to wait until the birthday girl got the card! I pretty much stole a great idea from my talented niece. While she and my nephew came to visit, we played with some ink and photo paper to come up with some fun designs which I posted HERE.

I loved what she did with the little mouse stamp and decided to use that idea for Heidi's card. I used a font that looks like dripping paint for her name. It is called Paintdrips and can be found HERE
For the inside, I used the acetate pop up balloons I showed you in the same post. I love this pop up style.I added some definition with a white pen.
 I hope Heidi enjoys this card!

I have a small request!

I would so appreciate that if you like my Digi's or Vintage Graphics, to PLEASE VOTE for me in my sidebar for "Top 100 Digital Stamp Sites." I think it's only a couple of clicks to complete. There's some amazing Digi Stamp sites there already, but it gives my blog exposure to more people who can have the access to my free images that you already have.

I guess you could say you're "paying it forward." How cool is that? Lol...

Thank you so much!

I will be posting another freebie later today...stay tuned!

Carmen

Oct 18, 2011

Tall Ship Digital Stamp

Hello!

What a busy week it's been already! A lot of my family seems to be experiencing transitions...all good ones! I am so, so tired tonight. After doing Daycare today, I ran around and got some things done before heading home. My hubby made me coffee when I got there and he also made dinner for a girlfriend of ours and I. (yep, he's a keeper!) 

She helped me with dishes, then after she left I quickly did my hair as I won't be able to fit it in tomorrow. I also had two phone calls in there somewhere, and I'm glad I can get this posted before I retire for the night. I want to get to bed at a decent hour; I need 9 hours of sleep to feel normal...and it's a 5:30 alarm! Life is good though!

So without further delay, I have the Tall Ship I promised a while back. This one is Graham's wonderful image!!! I will hopefully fit it in some time to do up a new digi this weekend!
This one doesn't need any coloring at all....just add water! :)


If you use our images in your projects, send me an email or a comment including your blog post address, and I'll add your photo and a link to your blog!

Here's an absolutely stunning card using this image by Lynn, from Creative Crafts by Lynn. 
She did an absolutely amazing job inking the clouds and water as well. Very impressive!! Check out her blog!
Teresa from Tickell Expressions also used this image on an awesome card! If you check out her blog, she has a link to the tutorial for this Twisted Easel Card. Also lots of other awesome posts to see!
Thanks so much for visiting!
Blessings,
Carmen and Graham

Oct 16, 2011

Ridgeview Card for October

Hello!

I've been quite sick lately, so I've been working on my Demo Card for the Ridgeview Class. I haven't been sick for years, but this last week I've been fighting a head cold which finally had me lying down yesterday. It takes a lot to get me to do nothing at all. Today I'm feeling a bit better, but still not 100%....hopefully tomorrow I'll be back to normal, because I don't want to let the kids down (Daycare)! 

Today I'll be showing you the card and the process. Do any of you have those Fall leaves that were available at the Dollar Store for a while?
I still had a bunch, and since the class is at the end of the month, but since Thanksgiving is over I just did a Fall card.
I used the leaves and turned them into a Fall tree!! :)

My first step was to glue two of the leaves together kind of offset. I used Tombow glue for this, but you could use Glossy Accents or other glue.
 
I had to let them dry for a little while. (So far I'm doing great with the photo documenting).

Then I cuttlebugged the front of the basic card. I wanted to use a folder that suggested movement in the air. Sorry...no photo of that part of the process.

I hand cut some hills for the card. One in a lighter patterned green, and the other in a darker colored green.
Again...no photo...hmmmm.... I'm not so good at this! Lol

Then I hand drew a tree trunk and put it through my Cuttlebug to look like wood.
Lol...well, here you can see the cuttlebugged background and one of the hills as well. I used some ink distressing to darken the edges of the hills to give it depth. I used dbl sided tape to place them on the card.
Then I found some ribbon (no photo again), but basically I just placed it around the card and taped it in place with double sided tape on the rear of the front of the card.

I used a smaller button and with some hemp cord tied it around the ribbon to create that puckered look. I love that look!
Then I put some glossy accents on the knot to hold it in place, since they tend to come apart.
 I used my Autumn Art Sentiment for this card and found a leaf border that I cut out with my Lynx to frame it.
Then, using a black fine point marker, I did the sew lines...and added some zig-zags here and there. So fun!

That's my card. Hope the ladies like it!

Graham has been working on some more images lately. I'll be posting them soon.

Jenn, from Stampin Angel Jenn made these adorable cards using my Autumn sentiment. She has some lovely cards on her blog...great inspiration. Check her out!! Here are her cards:


And card number 2:

Thanks for visiting!
Carmen

Oct 13, 2011

Spirit Bear Statue Freebie

Hello again!

This is my second post today! Well, technically it's Graham's post, but I'm putting it together for him. Graham has been working on a pretty cool image.

FYI,
Some years ago the B.C. Lions Society for Children with Disabilities launched an Orca in the City project and found sponsors to commission 120 orca statues through which they raised about $700,000 for its Easter Seal operations for children with disabilities and the Canuck Place children's hospice.

There are now 200+ Spirit Bear sculptures in B.C. The model is the Kermode, a black bear on the north B.C. coast that has white fur because of a rare genetic trait. There are many of these statues in Vancouver, B.C., all unique in their design.

Here's Graham's image. If you're into Native Indian Art, this may be just the thing you're looking for. 
Graham did up one from another viewpoint.


There are many unique bear statues like these all over B.C.

They even have a Darth Vader Bear, a Hockey player Bear, and one in PJ's, etc.To see a few of them, click HERE. 

Yes, British Columbians are a unique bunch! :)


Enjoy the freebie!


Blessings,
Carmen


Autumn is Here!

Hello!

I've been getting up early lately, and it's Chill-Y out there that time of day! It's beautiful and sunny out right now, but the temps are definitely dropping.

I recently took on a Secret Pal and am having fun with that, but when I do decide to make a card for her, I can't post it. Kind of a drag. Maybe I'll just take photos and post them all after the revealing function! :)

Anyway, I have a little sentiment for you today. No card though. :( Maybe later.
Here's a few extra leaves too..
Well, that's it for today. I hope to get my Ridgeview Card samples up soon!

Have a good day and thanks for visiting!!

Carmen

Oct 7, 2011

Primitive Candle Shelf Digital Stamp

Hello!

Some days I have a lot to say. Today is not one of those days! Lol....so right on with it then. I guess you could call this a Christmas image. It is now available in my Etsy shop.

Short and Sweet!

Enjoy!
Carmen

Oct 4, 2011

Branch and Sentiment Digi Freebies

Hello!

In my last post I mentioned that I would show you a card using the Bat Fold images. Here's my card:

 I think I figured out how to share the cut file of the Bat digi. You should be able to download it and cut it in SCAL.
Check it out and let me know if it works for you, okay?
  Bat Cut File
(If you don't have a cutter and want the digi stamp to paper piece the bats, click on the bat image below and save as in the new window).
 I thought you might like the branches as well:

I also have a couple of sentiments you might like:
 
Okay, I'm done for a while! Enjoy!!

Blessings,
Carmen

Oct 2, 2011

Bat Fold Images for Cards

Hello!

I'm back! It's been about a week, and I have been crazy busy!!!! Hopefully things will slow down for the next week!

I have some news for you....

It looks like I will be babysitting my grandkids 4 days a week starting next week. This means I will be a little busier than usual, and having to make up some of the time for my regular endeavors in the other 3 days of the week. It also means I will not be able to offer my soap making classes, nor my inking classes, which I mentioned a while back. I will still be offering free digitals - although not as often.

A girl can only do so much! :(

Starting in January things will ease up a little bit as my daughter-in-laws' Mom will be free to switch weeks with me, so that we'll each be doing 2 weeks a month. I will probably do more digitals again at that time.

I have been doing a bit of soul searching lately too and have realized I really want to do more writing. I will be revamping my other blog and working on some more creative writing in my spare time.

Well, that's my news. In the meantime, I have something a little different for you. I am working on a card and have made up a bat shape with folding wings. It's an SVG file, so these can be made big or small, and would look cute as an embellishment on a card. I'll include a photo of the folds, so you can figure out where to fold them. When I get the card done, I'll post it here as well.

*I don't know if Free Digital Stamps will consider these as stamps, so they will probably not show up on their site...therefore please refer your friends to this post on your blogs if you like these little bat folds. They're both the same...I just put two on a page.

I would offer these as cut files, but to be honest - I'm not sure how to do that. Anyone?? I'd love the help!


As you can see, I had initially intended to make a bat card, but changed my mind, deciding it would look better as a card embellishment. It looks pretty cute with the wings folded right in!!

Well, that's all ladies! I'd love to see your cards with some cute little bats hanging on it! Send the link and I'll post it here! :)

Blessings,
Carmen