
You wouldn't believe the frustration I've had the last couple of days! I had upgraded to SCAL 2.041, and for some reason my Cricut stopped working and froze everything up!! Aaarghh!! :(
The Craft Edge Support Team quickly came to my help and after trying various things everything is now cleared up, and I'm one happy camper! I have been known to cut every single little piece of paper needed in advance for a class of 20....but I'd really rather not if there's an easier way!
With that little problem occupying my mind, along with weekend company - this is the earliest I've been able to get these cards up.
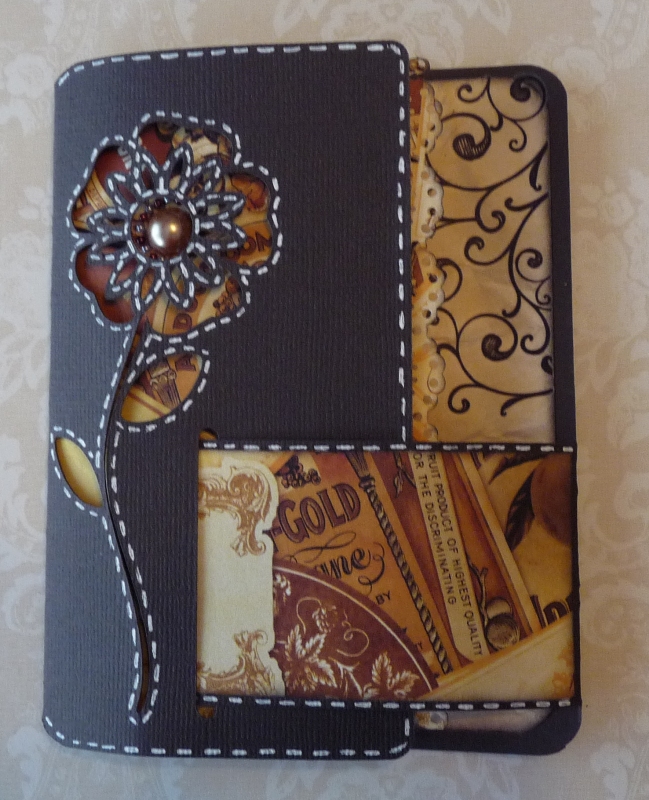
I've used plain brown Bazzill card stock which I've embellished with stitch lines using a white pen. The designer paper is a Dollar store find.

Here's the inside. I used some rub-on flourishes and a flower. Now I know the inside looks like I've used two shades of paper...but it's actually the lousy lighting I have to work with-and it's the same paper. :)

I also added a decorative pearl on this card. I'll see if I can find the brand.(sorry, couldn't find it) I'll add a list of the supplies I used at the bottom of this post.

This second picture of the inside is to show you how I put it together. Below is a photo of the template I cut with SCAL and the Cricut:

I fit 2 on a 12X12 page. This template came from the ULTRA talented Maria at Inspired and Unscripted. She created this file herself and offers it for free.
She's also added a tutorial for the liner, and another SVG for the label on the buckle. So awesome!! Now for my second card.

I added a sheer ribbon to this one and used her SVG for the tag on the buckle. I used rub-ons for the sentiment. Oh, and the flower center on this one is a brad which I removed the back from and attached with embellishment tape.

I added some Dollar Store bling to the inside of this card.
I actually wanted to do one with designer card stock on the card and plain card stock on the inside, but I didn't get a chance. Check out Maria's blog, as she has quite a few samples.
If you're fairly new to Blogs, here's a little tip. When you go to someone's blog, there are usually several ways to move around on it.
1) On some blogs you can click on HOME at the top of the page, and it will take you to the latest newest post, and all previous posts. On other blogs, if you click somewhere in the header at the top, it'll bring you to the home page.
2) Once you get to the bottom of the page, it will say 'older posts,' or 'previous posts,' or 'next.' If you click on that, it'll take you to previous posts on the blog.
3) Most people have a section on the right or left of their blog called 'blog archives.' It'll show the post titles of the current month, and then lists previous months underneath that. If you click on a month, it'll open up and show you all the posts for that month, which you can click on to bring up a post.
4) Some people have section called Labels on the right or left of their blog. Underneath is a word cloud, for example, mine says SCAL, Cricut, cards, scrapbooking, etc. If you click on any word, you will see all the posts that contain that label. So if you click on 'Cards,' you will bring up all my cards.
Okay, that's enough technical stuff. Here's my two cards again. I hope you'll go and make your own sometime soon!

Supplies List:
Bazzill card stock
Designer paper
Fancy French Market Rub-ons, by Fancypants
Inkssentials Opaque Pen, white
Dollar Store Bling
Sheer ribbon
Pearl bling for flower center
Brad for flower center
Martha Stewart lace edge punch
EK Success, scallop punch
SCAL
Cricut
Double sided tape
As always, thanks so much for visiting!
Have a good Sunday!
Carmen
This is really cool...I love it!
ReplyDeleteXO,
Jane
Beautiful! It's amazing what you can do with a cricut machine these days!
ReplyDeleteThis is incredible!! Wow. Every card gets better, Carmen.
ReplyDeleteBeautiful card - thanks for sharing & posting the link to Marias page
ReplyDeleteI LOVE YOUR CARDS! I just went to the site to download this file and it's missing. Is there anyway you could send it to me. I emailed Maria but haven't heard back and I need to make cards for a swap with my neighbor due this week. Any help?
ReplyDeleteThis comment has been removed by the author.
ReplyDeleteSo sorry to post again it's hotmail not gmail YIKES
ReplyDeleteNo problem. I sent the file to you. :)
Delete