How's life? Mine is full lately. I went to Lillooet to visit with some family from Holland, my dad and my sister.
My sister, who also loves to make things, showed me a couple of little things she made. I didn't realize it, but it seems Shrinky Dinks are popular in the crafting world right now. I love what she did with these, so I set about making my own. First, here are her projects.
This was a name tag she made for my Dad's new puppy. She used a dog biscuit cookie cutter for the shape. I've covered over the phone number, for obvious reasons.
This is her grandsons handprint made with acrylic paint, then shrunk. It was made for her son to keep on his keychain. Cute hey?
So after seeing these, I decided I wanted to make some too. As it turns out, while looking up Shrinky Dinks, I came across this post by Repeat Crafter Me. She had some fun making stitch markers. She also provides a template.
I loved her idea for the Yarn Ball Stitch Markers, so with this in mind, I made my own little Shrinks, thank you very much!
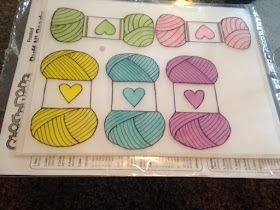
I found a couple of images for a yarn ball online as a guide and printed them off on some white paper,. There are literally tons to choose from. This is a full 8.5 x 11 sheet of the shrinky dink paper so you can tell about how large the images were to start with.
With a black permanent Sharpie on the smooth side of the paper I 'sort of' traced the yarn images, making some changes as I went along.
I drew a heart on the white paper and used it as a template for the hearts on the labels.
Then I used colored Sharpie markers on the textured side of the paper.
The colors get quite dark when baking, so I used these lighter colors.
Once they were all colored in, I cut them out and made a hole in each one with a regular hole punch. Remember, the holes will shrink too. Then I placed them on a cookie sheet covered with foil. Also, make sure when you place them on the foil, they're smooth side down, textured side up.
I baked them in a preheated 325F oven for about 1 1/2 minutes. They will curl first, but you want them to be flat before you take them out of the oven. Don't be impatient like I was the first time around.
Here they are fresh out of the oven. Yes, same ones! You want to start big. Look how much darker the colors are after baking as well!
I also decided to do a sewing machine, because I love to sew.
It's nuts how small they get, right? Here they are again. I will be making key chains and earrings out of these. I may have to make a few more balls of yarn so I have matching colors.
For the keychains I used a small jump ring to join the yarn ball shrinky dink to a clasp or ring. For the earrings, I will do about the same, but attach them to a hook.
The sewing machine image was found HERE if you'd like to make your own. Again, there are tons of yarn images on the web that you can use.
Well, that's about it for today!
Have a wonderful weekend,
Blessings,
Carmen


Fantastic ideas--you are so talented
ReplyDeleteLove Chrissie xx
Thanks Chrissy! Fun too!!!😊
DeleteThank you!!
ReplyDelete